

-
Reposted here for Grim, in case he doesn't see the original:
Jim's Night-Lighting Tutorial
Okay, I can't say that this is the ONLY way to do lighting. Or even the BEST way to do lighting. I simply say that this is MY way of doing lighting. It's based on what I've learned reading photography books on lighting, studying how Hollywood lights scenes, and how rennaisance painters lit their scenes.
Okay, first, let's discuss what you REALLY see when it's dark.
The human eye adapts to darkness fairly well, all things considered. We see better at night than many creatures do. Horses, for example, are pretty much blind at night. So are most large herbivores. It's why when Native Americans did cliff-drives of buffalo, they most often did them at night. During the day, you can't spook a buffalo for shit. At night, however, they can't see a damn thing, and a bunch of screamin', whoopin' guys with torches can easily spook 'em, and drive them all off a large cliff to their deaths.
That said, however, once the light level falls low enough, our color vision no longer works. Instead, we see everything in shades of gray. And below a certain point, we don't see a damn thing. A human will stumble around and fall in a small room lit only by a cigarette ember, while a cat can see just fine in the same lighting. Thus, when we do "night" scenes, we have to remember that what you REALLY see at night is a lot of nothing - it's dark. And even if it is light enough for you to see, you only see in shades of gray. If it's light enough for you to see in color, well, hell, it's not really dark, then. So, photographers, painters and hollywood filmmakers use various tricks to tell your mind "this is night" - the most common of which being deep shadows, blue or otherwise soft lighting, and hot-spots for lights only on the important elements of the scene.
So, let's set up a basic scene using an old Poser 4 character, "Lawgirl"!
Okay, scene is up and looks alright. Now, we need to think about lighting. After we strip out all the default lights, step one (for me) is the overall environment. Since this is a tutorial about night lighting, hey, it's outdoors, and it's night. Outdoor night means dim blue global ambient, coming from the sky and traffic and various city lights and what not. We want it juuuuuuuust barely bright enough to pick out the mortar in the bricks. And I'll have Ambient Occlusion on, because it might give us the beginnings of some decent shadows where edges meet. Also, since this is an alley, most of the actual light will be coming from above, so I'll be using IBL with a texture map that looks like this:
And this is what we get:
Hey, see that cool-lookin' cone of light thingie? Well, that's an actual cone prop I attached to her flashlight. Because dude, gettin' Poser to render a decent light-cone from a spot requires I use atmospherics. And you know what? I got other things to do than wait a few days for Poser to grind through atmospheric calculations. So hey, light cone. Old trick I picked up from Poser 5, still use it. Also, the front lens on her flashlight is set to white ambient with a value of fifty, because I intend to use IDL in this scene. Let's flick on indirect lighting, poke the render button and see what it looks like.
Hey, now we're cookin' with gas.
Next, we want to highlight two things: The character in the scene, and the focal point of the action. Usually these two things are the same, because 99.99999999999875% of Poser renders are straight-up character studies, and the rest are about evenly divided between action-shots of some bold hero beating the crap out of something, romantic scenes and erotica. In this scene, however, the character and the focus of the action are two different areas. So, I want a soft blue spot that calls attention to the character, and another that calls attention to the door she's lookin' at.
Hey, gettin' better.
Now, I got like a bajillion modeled raindrops hangin' there, plus I got specular on the walls, plus I got water in the alley. Yanno, I'd like at least SOME of that to show. So, I add a pale blue specular-only light (thanks, Nan!) to pop that out, plus switch on reflections to get the water in the alley to show.
Now, right there, that's actually good enough to say "This Is Night" for most purposes. If we're not going to rely on the flashlight to light up the scene, we just brighten up the two blue spots and we're golden.
But, I intend to have the flashlight add a bit of realism and drama, so we move on.
Next, I do a little jiggering with the flashlight effect. Ambient up so it'll work as an indirect light source, add a spot to brighten where she's actually shining it at, add another cone to simulate the mag-lite's focal center, and we tweak the transparency on the cone so the edges are faded, rather than crisp. The key here is that the brightest light is on the point of danger - where she's looking. This heightens the drama of the scene, yet maintains the "it's night" look.
And again, most people would stop there, because that's actually pretty good. It's exceptional when you consider that the character you're looking at is an unmodified P4 Casual Woman with a simple procedural for skin and some rudimentary textures on her clothing.
But, there's not enough drama in the scene for me, so now we tweak the lights a bit more.
Now, all this has been done with depth-mapped shadows. I know raytracing is faster, but depth-mapped shadows lets you do some interesting tricks. Like switch to the shadow-cam for the blue spot that's pointed at her head, zoom in real close so she completely fills the window, then change the shadow map dimensions to 1024 (always use power of 2 for shadow maps, never make a map bigger than this). The result is the shadow has nice, depth-mapped edges, and now is deeper and darker.
Add in a few thousand splashes for raindrops and other simple postwork, and there we are.
And that's how I do night lighting. -
THANK YOU! *SNATCH*
"I didn't attend the funeral, but I sent a nice letter saying that I approved of it. " Mark Twain. -
For Poser Pro2012:
Weight mapped Clothing rigging tutorial - you have to be signed in to see pictures.
http://poserplace.phantom3d.net/forums/viewtopic.php?f=24&t=122
A weight-mapped Antonia clothing rigging system is included in this big list of freebies for Christmas
http://poserplace.phantom3d.net/forums/viewtopic.php?f=30&t=205
* A child of five could understand this. Fetch me a child of five!
* Isn't it wonderful how cute weapons of mass distraction can be?
* Those are my principles. And if you don't like them, I have others. -
Another Poser Pro2012 weight-mapped rigging tutorial.
http://www.runtimedna.com/forum/forumdisplay.php?273-Poser-9-Pro2012-Demos-and-Tutorials&prefixid=sm2
* A child of five could understand this. Fetch me a child of five!
* Isn't it wonderful how cute weapons of mass distraction can be?
* Those are my principles. And if you don't like them, I have others. -
"I didn't attend the funeral, but I sent a nice letter saying that I approved of it. " Mark Twain.
-
Here's an impromptu Hair Painting Tutorial, to build upon the video I did a while back. BTW, LT promises there is something like Camtasia but less expensive out there...so maybe more videos are in my future?
What I used: Poser Pro2012, Photoshop CS5.1, and a Wacom tablet.
1. Preparation
Render your figure in Poser (or app of your choice) and be sure to do an Alpha Mask render of the main figure. Why? Well, it helps separate the figure from its context, and makes erasing boo-boos a LOT easier!
I rendered this piece 2800 wide by 3300 pixels high at 72 dpi.
For this demo, I rendered Alex (my figment) nude in a moderately elaborate scene. Here's his Alpha mask. When you use it in Photoshop, it's the same size as your full document--important--and you paste it into its own Alpha Channel.
 4-26-2012 3-50-03 PM.jpg725 x 860 - 44K* A child of five could understand this. Fetch me a child of five!
* Isn't it wonderful how cute weapons of mass distraction can be?
* Those are my principles. And if you don't like them, I have others. -
2. Separate the figure from its background
Your alpha render is gotten by hiding all the other stuff other than your figure (and his jewlery or clothing) using Shaderworks Advanced Render Settings and the Alpha selections. I do believe you can do this in Poser without this utility... Here's how the "Poser Handbook" shows it:
Here's the Shaderworks Advanced Render for Poser 9 dialogue:
In Photoshop, make a copy of your render (you can save it as a .psd document) which is on the background layer, then put a layer filled with a medium gray under that and on top of your original (which you are saving unmarked-on).
Click the Alpha mask to make it a selection. Apply it to the copy of the render and then contract the selection by 1 pixel with Select->Modify->Contract.
Create a layer mask for your render-copy by clicking the mask icon in the layers palette. Now he's sitting on a gray background. This will make working with colors and painting SO much easier.
What the layers look like now:
 4-26-2012 2-29-03 PM.jpg219 x 270 - 19K* A child of five could understand this. Fetch me a child of five!
* Isn't it wonderful how cute weapons of mass distraction can be?
* Those are my principles. And if you don't like them, I have others. -
3. Rough in the hair
I made a "hair" brush for Photoshop and using the middle tone for the hair (100% opacity and 100% flow), sketch out a nice fuzzy hairline. My beef with most hairlines I see? You really need to pay attention to real people or do your research on the web. On the side of the face, it goes back a little above the temples, then down toward the eyebrow as if it were going to hit the orbit of the eye/eyebrow perpendicularly. Then it curves back toward the cheekbone to cross that perpendicularly and then curves down in front of the ears. There is a tuft that connects up with the male beard or just turns into cheek fluff on women, and there is a good finger-width between that and the front of the ear. Hairlines that come straight down from the top of the face? Wrong, all wrong. That will not do!
Anyhow, after using that soft "hair" brush to fluff in the part on Alex's head and the bit of the hairline you'll see, use a small hard round brush to sketch the way the mass of the hair will lie. Hair is like cloth, that way; it sticks to itself and clumps (more if it's curly or dirty and straight, less if it's clean and straight). It has weight and mass and body. It is not a bunch of strings. :)
 4-26-2012 1-59-34 PM.jpg779 x 639 - 52K* A child of five could understand this. Fetch me a child of five!
* Isn't it wonderful how cute weapons of mass distraction can be?
* Those are my principles. And if you don't like them, I have others. -
3. Fill in with the middle tone.
Use a larger hard round, about 7 to 12 pixels for an image this size. Here, I worked on blocking the lower parts and am starting to fill in.
 4-26-2012 2-02-28 PM.jpg807 x 639 - 65K* A child of five could understand this. Fetch me a child of five!
* Isn't it wonderful how cute weapons of mass distraction can be?
* Those are my principles. And if you don't like them, I have others. -
4. Rotating the canvas sure helps when painting
This is another reason I use the CS version of Photoshop: I can rotate the canvas temporarily with out adversely affecting the picture, and I can hold the pen much more easily.
 4-26-2012 2-07-06 PM.jpg755 x 639 - 106K* A child of five could understand this. Fetch me a child of five!
* Isn't it wonderful how cute weapons of mass distraction can be?
* Those are my principles. And if you don't like them, I have others. -
Still filling in. with that "hard" brush. The larger strokes will be "clumped" hair. The finer strokes begin to give it texture. I tend to concentrate the finer brush strokes on areas that will be edges--no big hard edges, please. It gives the illusion of hairy detail.

 4-26-2012 2-13-02 PM.jpg878 x 639 - 72K* A child of five could understand this. Fetch me a child of five!
* Isn't it wonderful how cute weapons of mass distraction can be?
* Those are my principles. And if you don't like them, I have others. -
5. Soft "hair" brush used for the part.
You can see both individual hairs and skin--but not with infinite sharpness--so the "hair" brush is handy for getting the part filled in. I used the larger version here.
Another pointer: when using these hairy brushy, please open the brush shape dialog and rotate that sucker around somewhat randomly as you work This way you won't get those tell-tale long parallel lines that you see in some hair painting.
My, it does look like he got crazy with the mascara, doesn't it?
 4-26-2012 2-15-58 PM.jpg975 x 667 - 118K* A child of five could understand this. Fetch me a child of five!
* Isn't it wonderful how cute weapons of mass distraction can be?
* Those are my principles. And if you don't like them, I have others. -
All blocked in. This is what you'd do in a traditional media painting, too. Texture is not done so much by showing hairs but by hinting at them. However, the strandy random stuff on the edges of the masses does a lot toward creating a likeness. If you're wondering, that's a 7-pixel brush, there.

 4-26-2012 2-23-35 PM.jpg729 x 639 - 53K* A child of five could understand this. Fetch me a child of five!
* Isn't it wonderful how cute weapons of mass distraction can be?
* Those are my principles. And if you don't like them, I have others. -
6. Highlights and where they go
You did paint your hair on a separate layer, right?
So hide that layer for a minute and study the light landing on the figure. You get a highlight on the part of the surface perpendicular to the light rays, and that's the only place you paint them! This is especially so in dark hair.
DO NOT run your highlights into streaks along the strands of hair. It doesn't work like that.
Bald Alex again, with highlighted areas pointed out.
 4-26-2012 2-32-16 PM.jpg958 x 639 - 37K* A child of five could understand this. Fetch me a child of five!
* Isn't it wonderful how cute weapons of mass distraction can be?
* Those are my principles. And if you don't like them, I have others. -
I made the notations on another layer. You can do that and have that on a layer above your hair layer, if it helps.
Another thing about hair highlights: Highlights, not midtones or shadows, give texture to a surface. So now use a soft small round brush (about 5 pixels) at 70% opacity and 70% flow, and be very careful where you stroke that in. Short, smooth strokes, a little random. Run short strokes "along" the imagined hair and make the highlight ride perpendicular to the hair strands. This should be subtle.
What color? I used a desaturated light yellow, because that was the color of that light.
I used rim lights, so more toward the back of his head tapering off toward his nose, which is beaky enough to have its own highlights.
 4-26-2012 2-36-53 PM.jpg958 x 639 - 52K* A child of five could understand this. Fetch me a child of five!
* Isn't it wonderful how cute weapons of mass distraction can be?
* Those are my principles. And if you don't like them, I have others. -
Need to tone this down and bring some light into the rest of his hair. So, get out the smaller 27-pixel "hair" brush and use a mid-to-dark version of his base hair color to brush over those highlights to tone them down ever so slightly. The soft brush and the lower opacity/flow settings will make the colors blend nicely.

 4-26-2012 2-41-16 PM.jpg958 x 639 - 101K* A child of five could understand this. Fetch me a child of five!
* Isn't it wonderful how cute weapons of mass distraction can be?
* Those are my principles. And if you don't like them, I have others. -
Using this nearly-the-same color makes his less wet and less flat looking.

 4-26-2012 2-44-08 PM.jpg958 x 639 - 63K* A child of five could understand this. Fetch me a child of five!
* Isn't it wonderful how cute weapons of mass distraction can be?
* Those are my principles. And if you don't like them, I have others. -
7. Add the dark-dark colors to give shape and depth.
This may be hard to see on some monitors, due to Alex's dark hair, but I go in and look for spaces right under highlights and in polygonal holes--lots of long triangular shapes--to put a very dark and moderately saturated version of his main color.
Rotated again, to save the wrist--
Then use the soft 27-pixel "hair" brush to add more depth on those areas that are really dark.
When working on the shadows, use the layer transparency lock to keep tidy.
 4-26-2012 2-49-18 PM.jpg958 x 639 - 54K
 4-26-2012 3-17-17 PM.jpg1218 x 671 - 153K* A child of five could understand this. Fetch me a child of five!
* Isn't it wonderful how cute weapons of mass distraction can be?
* Those are my principles. And if you don't like them, I have others. -
8. Shadows on a layer *under* the hair are important to getting it to "sit" right and blend into the figure.
I used a dark flesh tone, the smaller "hair" brush, and quickly worked that in. Doesn't have to be super perfect--and shouldn't be.
If one hid the hair layer, this is what the shadow layer would look like. Not impressive, eh?
Blur it about 1.7 pixels with a Gaussian blur when you're done, If it's too light, work it toward more color and use Hue/Saturation dialog to adjust it. When you can't tell it's there but things look better, that's when it's right.
 4-26-2012 3-19-11 PM.jpg697 x 550 - 70K
 4-26-2012 3-22-16 PM.jpg722 x 639 - 41K* A child of five could understand this. Fetch me a child of five!
* Isn't it wonderful how cute weapons of mass distraction can be?
* Those are my principles. And if you don't like them, I have others. -
9. Add random hairs.
Use a lighter color, one not exactly like the main color, and run some tiny strokes around. People always have flyaway hair--especially long hair. This will add verisimilitude without being obvious. If it's too obvious--undo.
And that's pretty much it for the hair. Further postwork to adjust the images overall colors, if properly applied, will blend it nicely into the picture.
 4-26-2012 3-27-52 PM.jpg958 x 639 - 74K* A child of five could understand this. Fetch me a child of five!
* Isn't it wonderful how cute weapons of mass distraction can be?
* Those are my principles. And if you don't like them, I have others. -
THANK YOU. :D
"I didn't attend the funeral, but I sent a nice letter saying that I approved of it. " Mark Twain. -
You're so welcome!
Hair is fun to do because the texture is so damn challenging. It's not cloth, and it's not a mop--with big strings.
Now, another fun thing is that you can use this basic painting technique--and it's just regular painting wet-on-wet, working mid-tone to light to dark, as traditional media artist will recognize--on anything. You can certainly do cloth this way!
* A child of five could understand this. Fetch me a child of five!
* Isn't it wonderful how cute weapons of mass distraction can be?
* Those are my principles. And if you don't like them, I have others. -
*whimper*
I see I won't have any time at all for sleep this summer.
Suspiro ergo sum. -
Uhoh, cutting into nap time already? :Psurochek said:*whimper*
I see I won't have any time at all for sleep this summer.* A child of five could understand this. Fetch me a child of five!
* Isn't it wonderful how cute weapons of mass distraction can be?
* Those are my principles. And if you don't like them, I have others. -
There are indeed times when I resent having to sleep...because there are Things I Want to Do!
* A child of five could understand this. Fetch me a child of five!
* Isn't it wonderful how cute weapons of mass distraction can be?
* Those are my principles. And if you don't like them, I have others. -
Making Full Body Morphs (FBMs) in Silo on Grouped Figures
I had to make a little adjustment to a really nifty trick that Fenric showed me, but this works very nicely. If you have taken grouped figures into modeling apps to make morphs, you know that it's easy to create gaps between groups, which mostly don't show up in Poser--but sometimes they do. This is how to work around that.
I used: Poser Pro2012, Silo, and EditPad.
1. Make a copy of your finished geometry to "ungroup." Now open the OBJ file in Editpad (or whatever text editor that will not format your plain text file) and basically do a find/replace:
Replace "usemtl " with "#usemtl " (note the space)
--this comments out the old materials. They will be lost.
Replace "g " with "usemtl " (note the space)
Save the file
2. Open the file in Silo. There will only be a single figure now--but the polygon islands will remain. So, select those islands and create Materials for them with the same names as the groups had--
hip
abdomen
chest
lCollar
rCollar
lShldr
rSldr
and so forth, using the proper Poser names for those parts.
3. Now you can use your soft select and paint displacement or whatever in poly mode and create the FBM (even if it is only intended to target, say, a hem, it's still going to be an FBM.
4. Now select the entire morphed figure and File->Save Selected Object... and save the morphed figure with a new OBJ file and name. It is now a full-body morph target.
5. Open the morph target OBJ file in Editpad and do a global find/replace
Replace "usemtl " with "g " (note the spaces) --Because this is a morph target, materials are of no concern now.
Save the morph target OBJ file with an incremental # (for safety).
6. Open Poser and load in your rigged clothing figure.
7. Load up the morph target as an FBM.
Figure->Load Full Body Morph...
Give it a proper name.
Done!
8. Save a new copy of your rigged figure.
Works great! :D
NOTE: if you save your Silo file you can save those material zones for future use on any morph target.
* A child of five could understand this. Fetch me a child of five!
* Isn't it wonderful how cute weapons of mass distraction can be?
* Those are my principles. And if you don't like them, I have others. -
I'm totes gonna try this right now. /runs off to workladyfur: 'in your easter bonnet, with mandrakes all upon it, you'll be the faeriest fella in the easter parade...'
-
I did notice that when the former-groups separated significantly in Silo after using a Smooth brush, I did still see a bit of an effect in Poser--about the same as when they're still regularly grouped and that happens. But overall, this was easier to manage FBMs.
* A child of five could understand this. Fetch me a child of five!
* Isn't it wonderful how cute weapons of mass distraction can be?
* Those are my principles. And if you don't like them, I have others. -
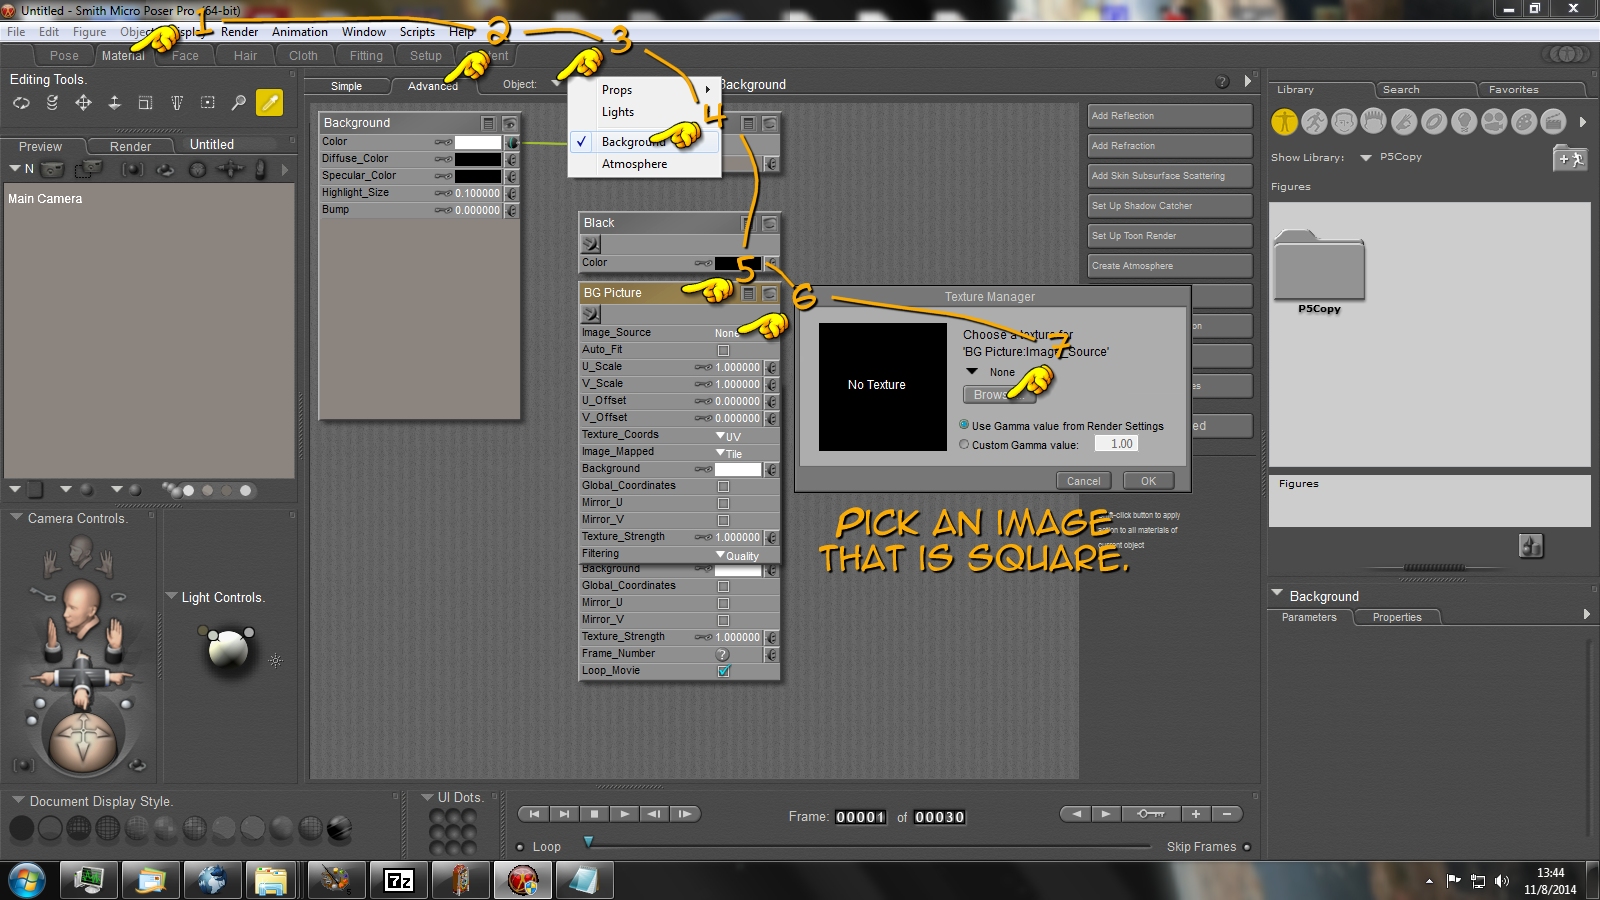
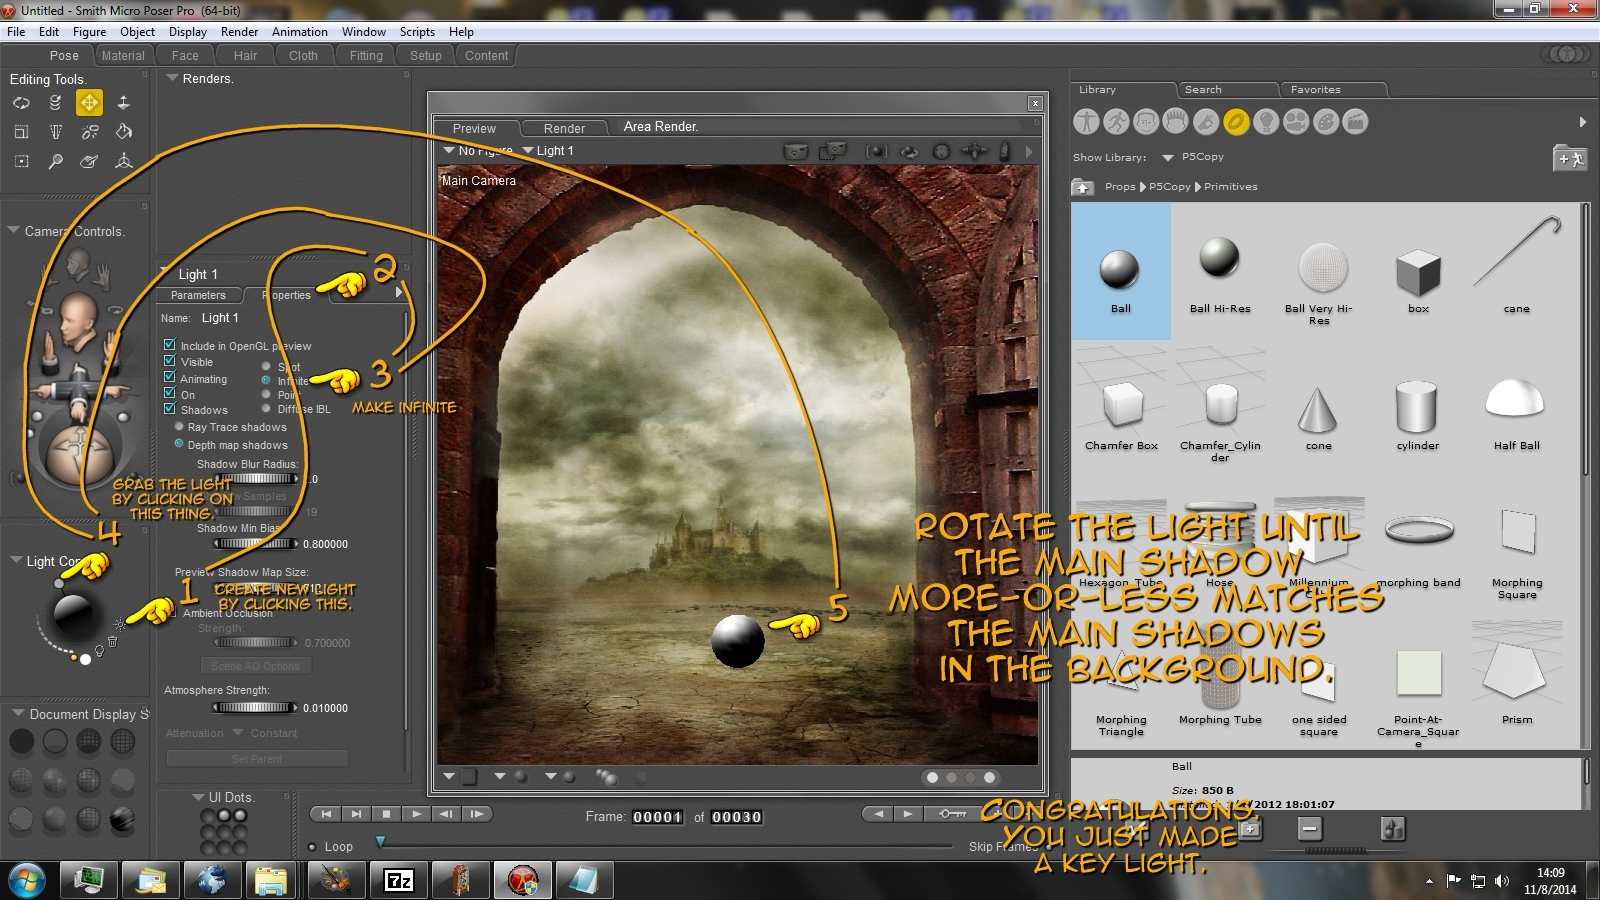
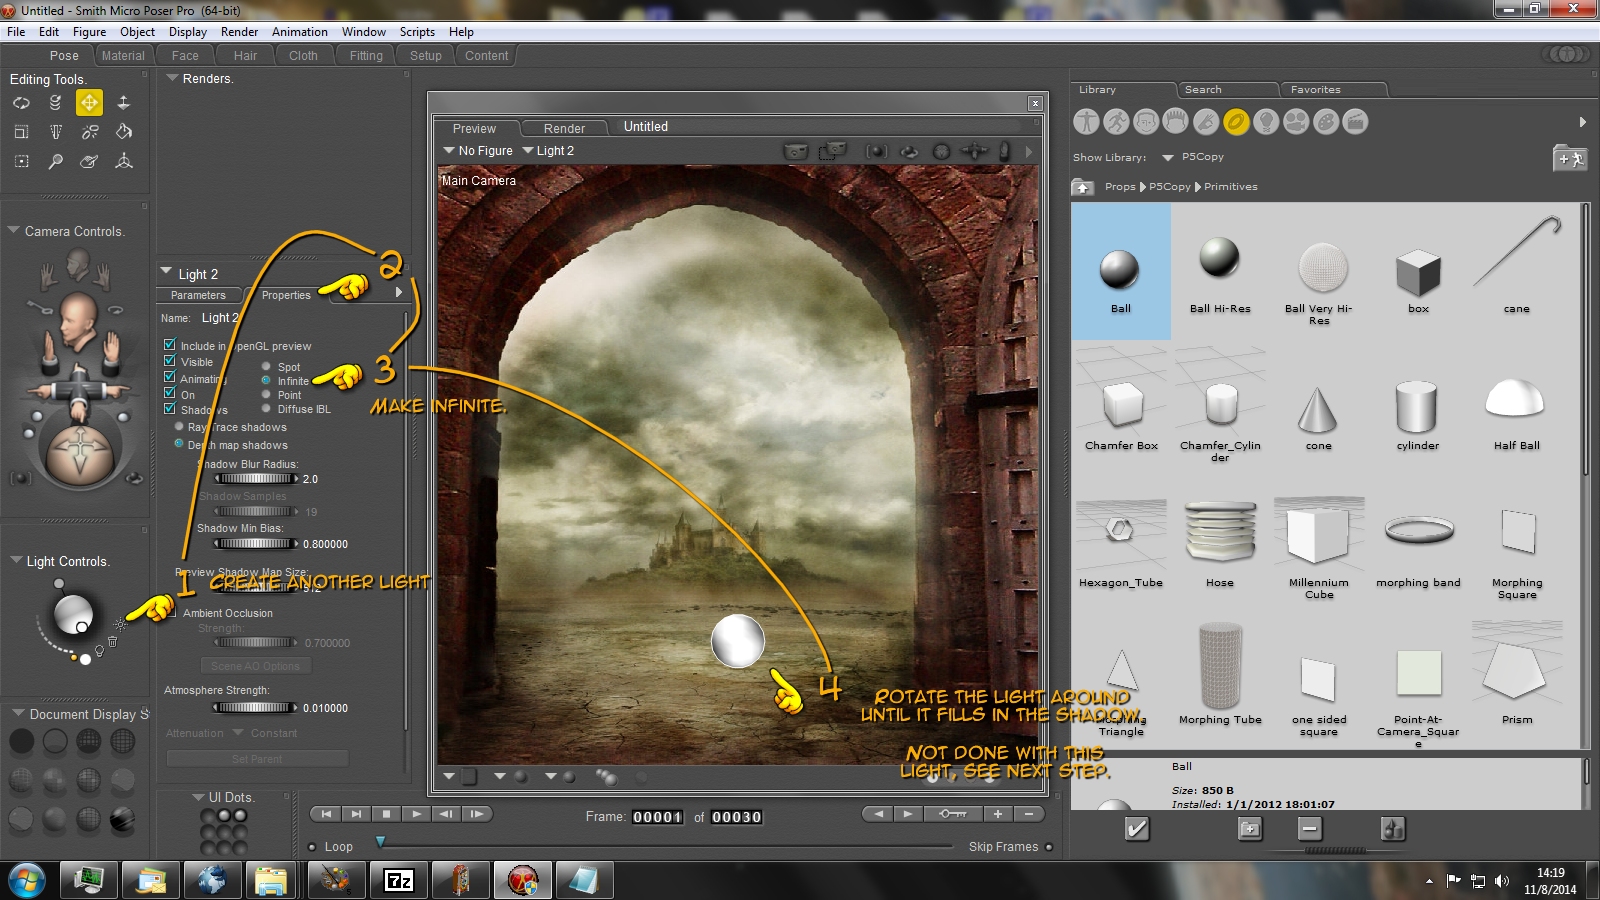
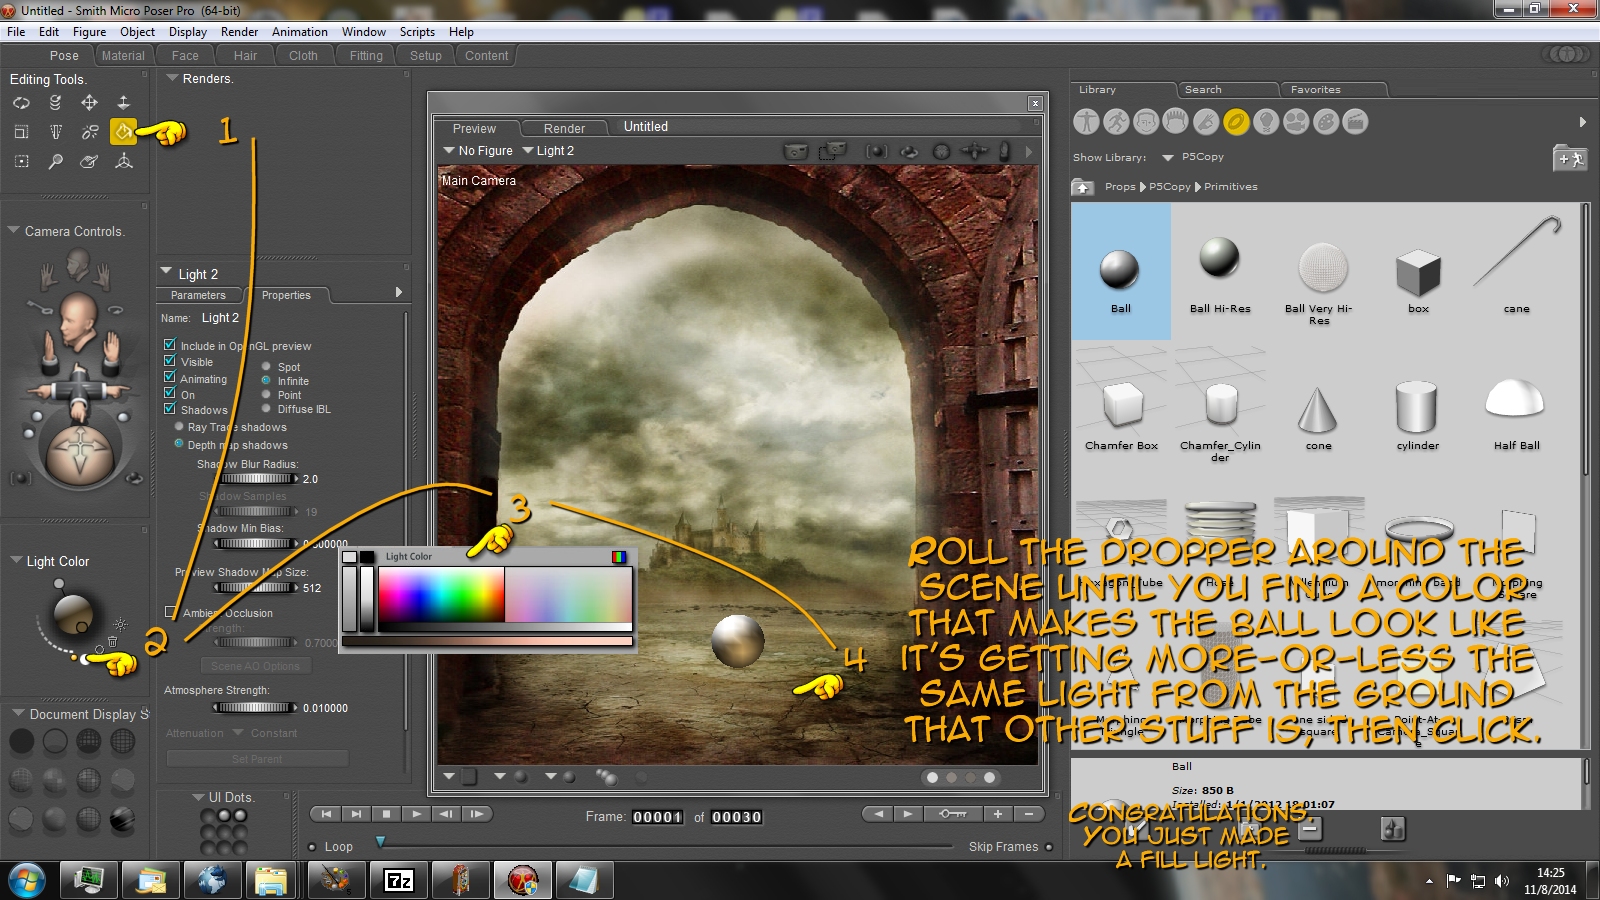
Jim's Quick & Dirty Lighting Tutorial
All images are clickable to enlarge, each image shows step-by-step, click-by-click instructions.
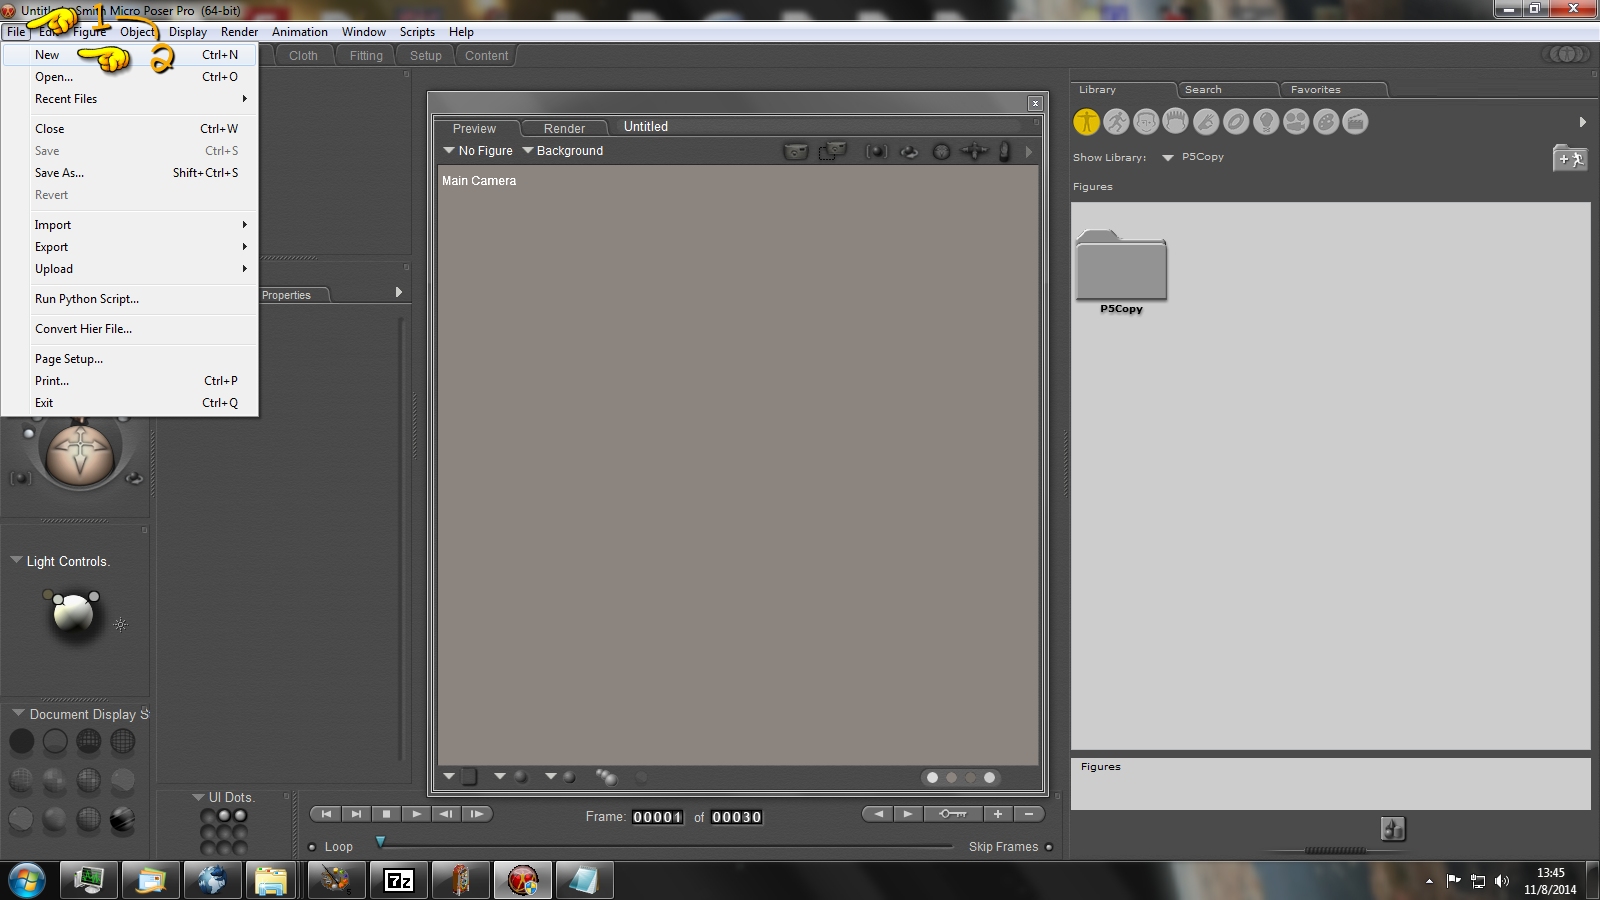
Note that I included the background image I used as an add-on to this post.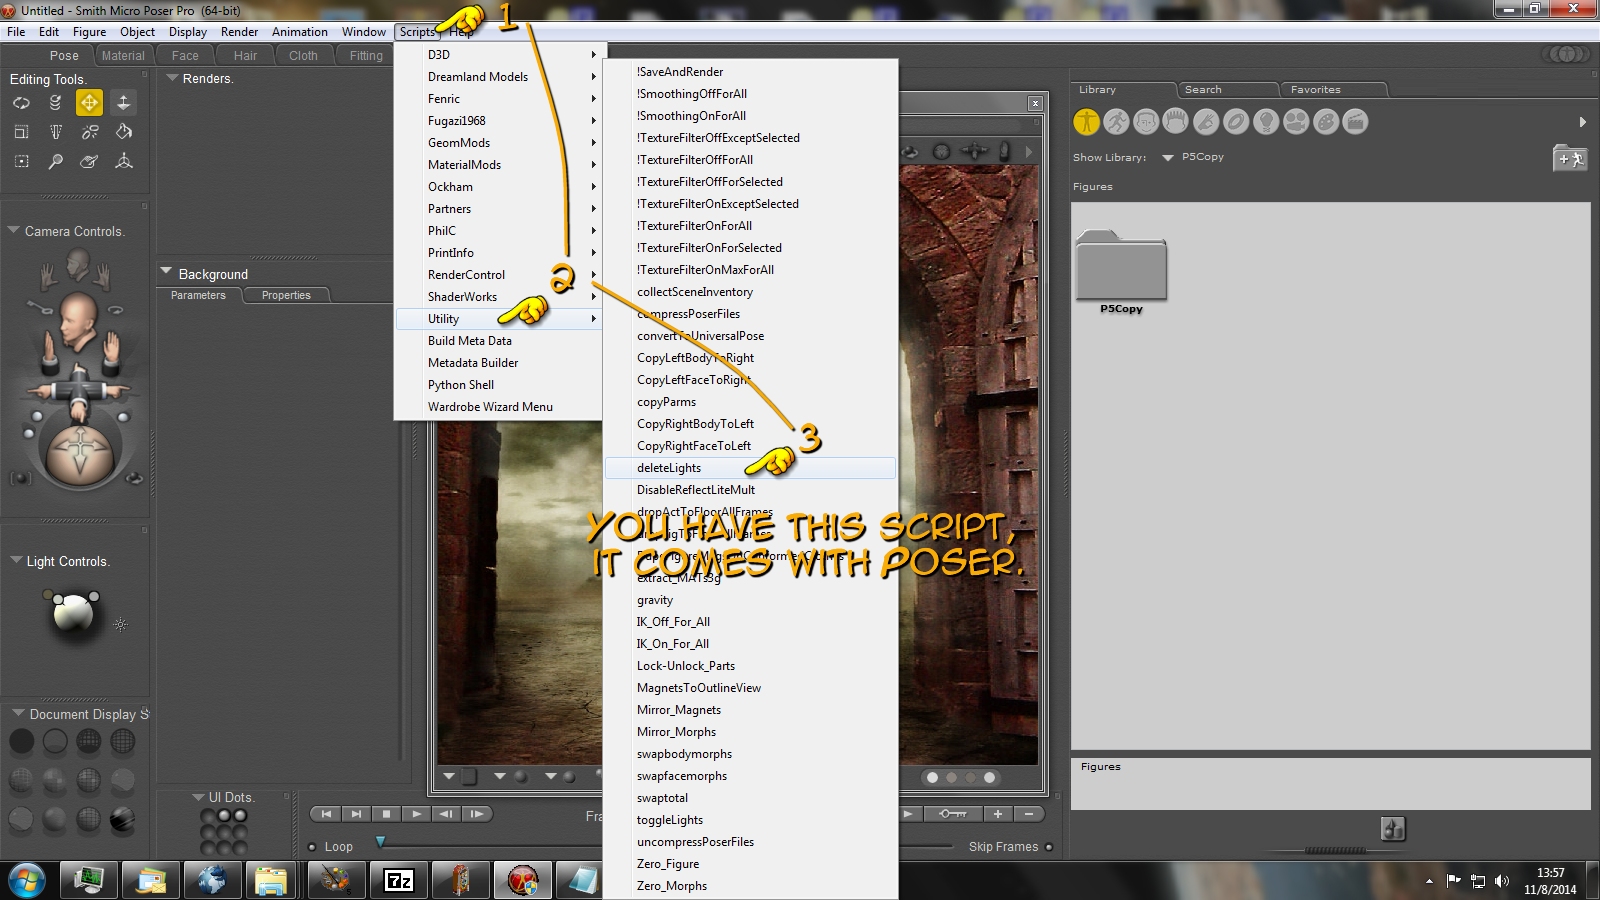
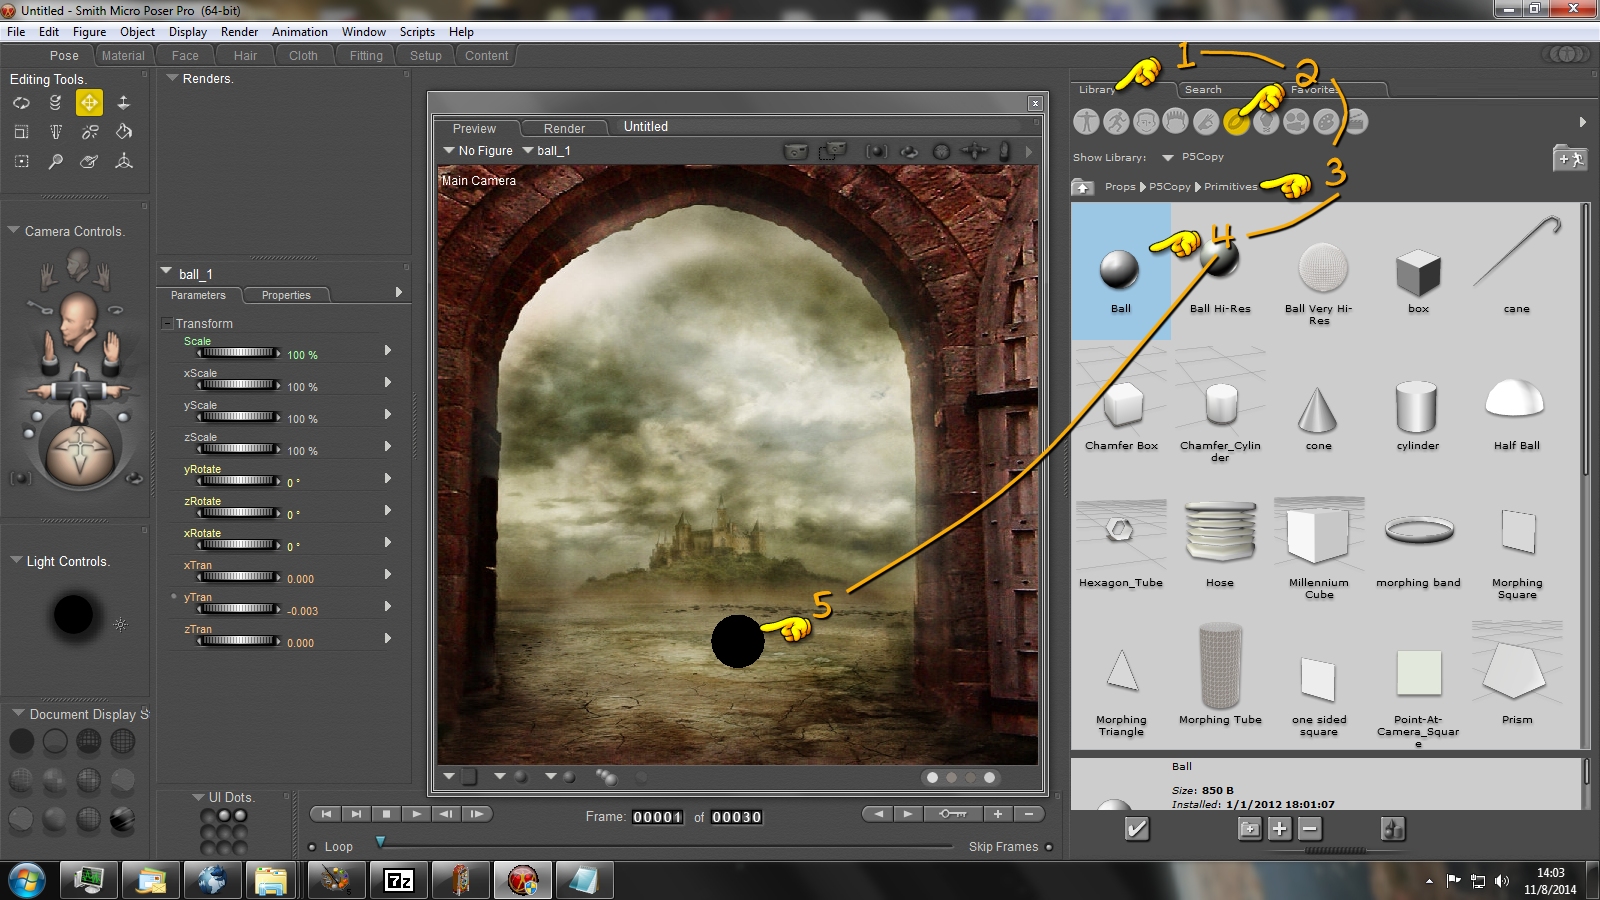

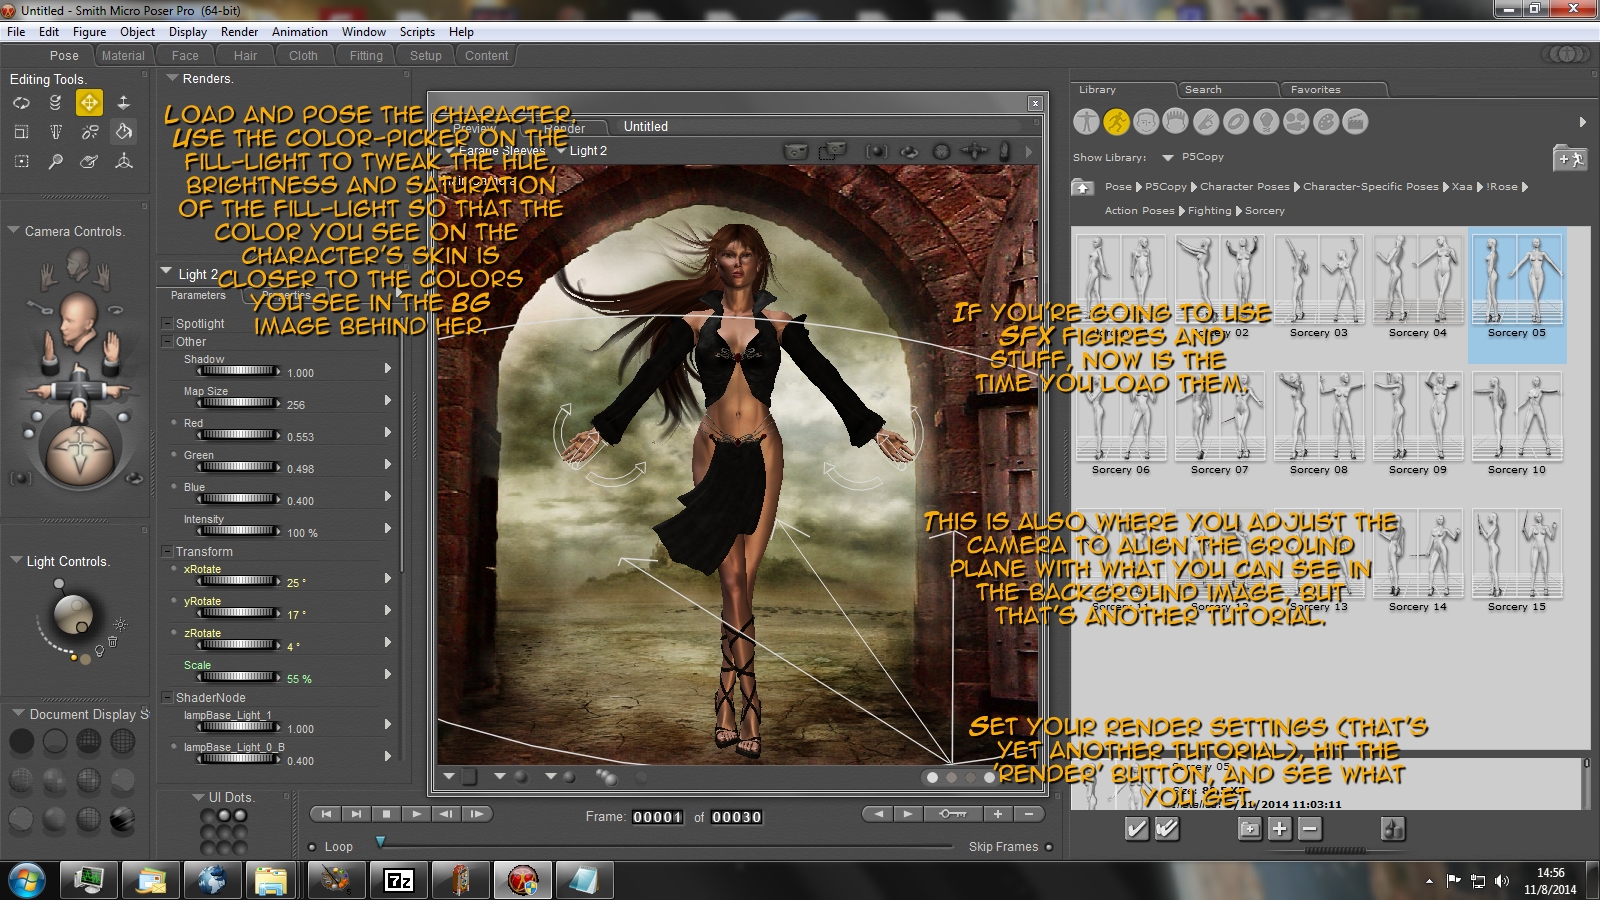
In my case, what SFX figures and props I added was an IDL Pano-Sphere set as not-visible to camera which I then popped the background image onto so as to smooth out the lighting and permit better IDL and SSS. I then added a couple "plane" props by her hands to put glowie-sparklie-stuffs on, and poked the "render" button.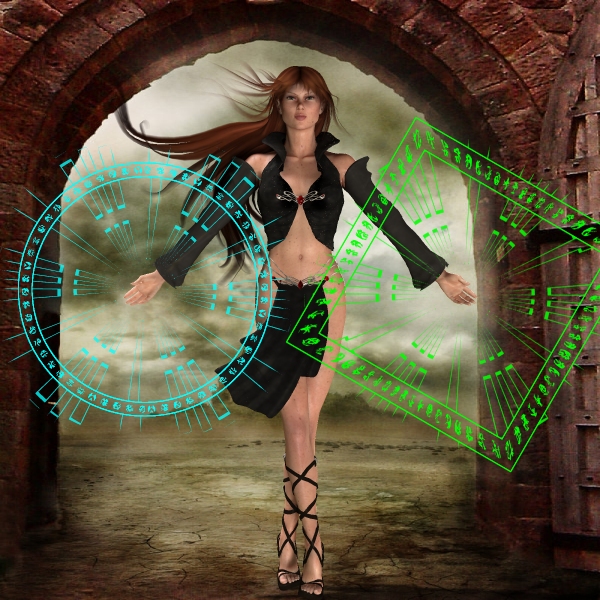
Not bad for five minute's work. At this point, I would tweak the lights a bit, make the shadows and highlights match more closely, and so on. But, that's the basics of lighting. tutbackdrop01.jpg800 x 800 - 321K
 -
Note: The next few tutorials were written by me anywhere from a year to two years ago, and may not reflect my current workflow. They do, however, work.
-------------------------
Using the Cloth Room to put Folds in the Fabric of Conforming Items:
Okay - step 1, create the item with mat zones laid out like groups. I also name them the same as the groups so I won't forget. Step 2, import, run a thirty-frame sim to get the basic fabric lays. Here's my result:
I've got a fairly dense poly layout, this should work alright. I colored all the material zones differently so you can see them.
3) Import results of #2, new sim, length 60 to 120 (frequently on the high end). At frame 15 to 30 (experiment to find the best time to get the least crunched polys), pose the character with both arms down 45 degrees, both elbows bent 45 degrees, and both hands rotated palm-down at the forearm 45 degrees. If the item includes pants, bend hips 45 degrees and knees 45 degrees. You may need to repeatedly run the sim to determine the best cloth-room settings - Phil C's presets help a LOT here. Run sim until you're satisfied with cloth performance, pick best frame, export.
4) Clear out the animation of the character by changing the final frame to "1". It will ask you if you want to delete frames. Say "yes."
Step 5) Zero-pose the character. I use a script for this, but PhilC's Poser Pocketknife also has a button for it.
Step 6) Import your result from step 3. Change the last animation frame to 60 or 120 (longer for more complex cloth). Advance the frame to frame 15, hit the "+" key to make it a keyframe of the character in their zero pose. Go back to frame zero and pose the character to fit the clothing. Arms bend, etc. Run a cloth sim on the garment - the sim will drag it back to the zero pose. Because the cloth started with folds in it, those folds will tend to remain. You will also generate counter-folds as the character straightens out. Smooth any polys that overlap with the morph brush, and export.
Okay, at this point, depending on the garment and how the sims come out, I'm sometimes doing a lot of export-import-pose-repeat to impress folds where I want them. Some areas of a garment may have been modeled too tightly, and when the character straightens, they smooth out. I fix this by tugging more space into the overall area with a VERY broad morph brush, and running through the export-import-clothsim-repeat process several times until the folds look the way I want. The process isn't difficult or even very time consuming, though. When you enter the cloth-room, you don't have to create a new sim, just use the old one and clothify the newly-imported item. You can also save the character's pose to the library, and quickly alternate between having it posed or zeroed, depending on which part of the cycle you're in.
Eventually, however, I end up with this:
So.... Export the result.
Okay, I now have a completed cloth item with folds impressed. I then use the mat zones I made to create groups.
Clicky for lots larger.
Once it's grouped, take it to the setup room, use a character blank as a bone donor, and proceed through the rest of your rigging process normally. Save to library.
Once the basic fabric lays and folds are in place, you can then import the model into your modeler, and add various details. Buttons, seams, trim, thickened areas at cuffs and collar, and so on.
Addenda to above: Once you have it grouped and rigged, you're basically looking at a model with bunches of materials named after the groups. What if you don't want that?
Well, if you want different material layouts, usually it's easiest to do it in your modeler. But if you only want ONE material on the whole thing, that's easy. Just load the figure, open the group editor, and click "new group." Name it "temp". Then click the "add all" button - bam, you now have all polys lit. Click "Assign Material", and type in a material name, like "fabric." POOF - the whole figure now has "fabric" assigned. Then click "delete group" to get rid of the temporary group. All the areas will still retain the mat assignment you just did. Save to library (remembering that the OBJ will end up in whatever folder you're saving the character to so you may want to change that), and you're done. -
Using PhilC's Poser Pocketknife to Rig a Simple ERC Connection:
Okay.
Step 1) Make a quick mesh in MAX that has two moving parts that have related movement so we will have an excuse for rigging ERC.
Step 2) Export as OBJ to the geometries folder, then open PHI builder and arrange the hierarchy. Save the resulting PHI file to the same geometries folder.
Step 3) Open poser, and click file>convert hier file. Select the PHI you just made, you'll get a pop-up. Enter the new figure name and click OK. The new figure will appear under your main runtime, in the "New Figures" folder.
Step 4) With the new figure loaded in Poser, throw some quick procedurals on it, then open Poser Pocket Knife.
Step 5) Click "Remote Control", then "Define Master/Slave Actors", then set both Master and Slave figure to the same figure (in this case, our clock):
Now, the simplest way to do control ratios is to reduce it to a factor of one on the master dial equals X on the slave dial. In this case, for every 360 degrees that the minute hand turns along the Z axis, the hour hand should turn 30 degrees. Which means for every 12 degrees the minute hand moves, the hour hand should move 1 degree. Which means for every 1 degree the minute hand moves, the hour hand should move 1/12th of a degree, or about 0.083333 degrees.
So...
Step 6) Click the "Master actor" and select the minute hand. Click "slave actor" and select the hour hand. Click "Master dial" and select zRot. Click the slave dial and select zRot. Click "Standard Ratio" and enter 0.083333 into the pop-up. Then click "Apply."
And that's it, the hour hand is now ERC linked to the movement of the minute hand.
Because of fractions, it isn't perfect - after a few hundred sweeps of the hour hand around the dial, you'll notice it starts to lag behind. But, for Poser, it's good enough.
And that's how to use PhilC's Poser Pocket Knife to rig a simple ERC connection.
-
Character Rigging Walkthrough/Tutorial:
Done as part of helping Fenric with his Fox-babe. A sort of a drunken mix between a walkthrough and a tutorial, but there's a lot of info here. Grouping, Rigging, ERC and JCM's is all covered.
Step One: Examine the topology. Topo lines need to flow from centerline to extremities. Where there is problems, note it for future reference, you'll need to know it when you're doing rigging.
Like this collar area. That's going to be tedious.
Step 2: Carefully check the group names in your modeler. They must match Poser conventions as closely as possible. Because if they don't, several of Poser's really necessary features are not gonna work right. Like the "symmetry" command, which is critical to rigging.
Next, PHI builder - and we quickly find it rejects the model because of failure to conform to naming conventions. Argh. Back to our modeler, rename the bits PHI builder doesn't like. And I can already see a problem both with naming and rigging so I"m gonna head both of those loose cattle off at the pass by re-grouping the lower legs.
When grouping, you want to follow topo lines if you can - but, you also want to remember that bones work in a specific way, and they like clean breaks that are planar to horizontal, vertical, or fore/aft. In this case, I'm gonna drop a slice right across her mid thigh to make new buttocks groups, since the old one went too low.
Okay - Check out this grouping setup:
The advantage of doing it this way is that when you apply poses for other humanoid characters, most of them will actually WORK.
The reason is because 1) group names are the same, and 2) the bends that will be applied to the human legs to get them to walk or run or whatever will coordinate to the bends that would be applied to this character, since you (correctly!) made her default pose a proper stance, rather than just making her ramrod straight (like Expressionimage did with FemaSu). EI also named what I called "foot" as "meta" (as in "metatarsal"), which means she can't use any poses made for other characters. Check out how I did the group names for the Dragonfemme, you'll see how it should be done. I didn't point the foot out (the model started that way), but I still called it "foot". That lets me apply human poses, and all I have to do is tweak the feet to point correctly. Can't beat that.
Two more things: I'm welding "tail base" into her hip. Trust me, this will work better. Also, I'm re-naming "tail_tip" to "tail_12". This also will work better.
Fenric said:So, usually leave numbered chains numbered all the way through?
Yes. That way when it appears in PHI builder, your chains will be very easy to sort. Also, building chains with tools like EasyPoseUndergound will be a lot easier with the chains numbered this way.
Okiliedokilie. Back to the teeth and gums and such, and a discussion of naming conventions.
If it's right of the centerline of the character's body and has a matching part on the other side, the first letter must be "r" and all the following characters must be identical to the mate on the other side. If it's left of the centerline of the character's body, the first letter must be "l", and the rest identical to the mate on the other side. If it's neither right nor left, you can name it anything... BUT:
PHI builder was made for Poser 4. And that means TIGHTER naming restrictions. Which is good (discipline! Builds Character!), but bad in that it doesn't tell you WHY it don't like a name (WTF?! Why doesn't it like THAT name?!)
So:
You got "teeth", for example. Upper and lower. Don't name them "upper_teeth" and "lower_teeth". Name them "teeth_u" and "teeth_l" That way, PHI builder loads them and says "ah, this is teeth_l, it goes before teeth_u". Because PHI builder does everything alphabetically. And what makes an otherwise kosher name NOT work is when PHI builder can't figure out where the hell the name is supposed to go in the alphabetical hierarchy it's building. "upper_teeth" and "lower_teeth", as far as PHI builder is concerned, are NOT RELATED. But "upper_teeth" and "upper_gum" ARE. You dig? It's all alphabetical.
What broke with PHI builder, as I said, is the name. So, I renamed it. For future reference, however: Never "upper_teeth". Always "teeth_u". Trust me, it will make your workflow a LOT faster.
Now, PHI builder automagically knows that "hip" is always where we start. Which is good. But if you're ever building a figure that doesn't HAVE a hip (like, say, a car), this is bad. Trick: Name the root group of the car (or whatever) "hip" anyway. Seriously. You can change the name in Poser back to something like "chassis" or whatever, the user will never know. And it will allow you to just load the thing in PHI builder, straighten out the hierarchy in a few minutes, save, import, viola! ready to adjust groups.
Anyway... In "Tree view" of PHI builder, we can drag-drop groups. You will want to assemble your hierarchy from the outside in. For example, PHI builder will group everything that starts with "r_index" together. So, you drag-drop it onto the r_hand group to link it. Continue assembling your hierarchy from the extremities working back towards the hip, and when you're done... Save! Remember to name the extension of the file as "phi", and for ease of finding it later (hey, you might need to do this again), I usually name it the same as the geometry it points to. All files for PHI builder MUST be in the "geometry" folder BELOW the runtime that PHI builder is sitting above. For example, my copy of PHI buidler is sitting in F:P5_Copy, so the geometry files it looks for must be under F:P5_Copy\Runtime\Geometries\
Eventually, you will have your hierarchy ordered in PHI builder.
Now, as I mentioned to Epi, all PHI builder does is crank out a text file that has this hierarchy properly indented so Poser recognizes the hierarchy. You CAN type this all out yourself. And I have, on those occasions when I was rigging a character where the hierarchy was short. In every other case, however, I damn well use this tool, because it's a LOT faster then manually typing out the hierarchy. Because the number of typos you are allowed in a PHI file is ZERO. The only reason it's taking me this long is because I have to figure out screenshots and type up a step-by-step for each part of this. Normally, I'd already have the character in Poser, and probably have most of the rigging done by now.
Aaaand drumroll, please!
Lum-tee-dee-dum...
Okay - more talk about PHI builder.
As I mentioned to Epi, you have to set the bone orientations correctly, otherwise it just messes things up.
Here's a guideline you should follow when setting bone orientations (save this to your hard drive, you will need it later):
"Arms", of course, applies to the fingers, but the thumb should be oriented in the same direction as the feet.
Addenda to above 11/8/2014: What the rotations mean is which direction the bone axis will be oriented to, and which dials do what. The first is always the "twist" dial, rotation along the axis the bone lies on. The other two are "side-side" and "bend" dials and such, depending on direction.
Here's where the advantage of the PHI file being a text file comes into play: Yes, you can carefully click on each group and change it's orientation. Or, hell, you can open the damn PHI file in a text editor and do find/replace! Woot! See, there are 15 groups (rToe, lToe, rFoot, lFoot, rShin, lShin, rThigh, lThigh, rButtock, lButtock, hip, abdomen, chest, neck, head) that required vertical orientation, six groups (rFoot, rToe, lFoot, lToe, rEye, lEye) that require forward orientation, but thirty-eight that require lateral orientation (arms, hands and fingers) Save yourself the trouble and find-replace.
Now, this is where you carefully check to make sure all your bones are pointing the right way. For example, here, notice the head is TOTALLY WRONG. The falloff is pointing to the chest, it should be pointing into the air. This is because I buggered the damn bone orientation. Remember I said you might need to do this again so you needed to save the file with a name that's easy to remember? Yeah, this is why. It's a simple fix - change three characters in the PHI file, save, import again. Remember do delete the screwed-up character from the library BEFORE you import.
-
Next, the setup room. THe first thing you want to do is set the camera to either a front, top or side view. Never - and I mean NEVER - use any view in the setup room other than FRONT, TOP or SIDE. Because if you FORGET, you will be putting bones ALL OVER the damn place and you'll screw up the character and have to start again.
Here, the first thing we check is, again, bone orientation. We want to make sure all our bones are pointing in the right direction. For bones like the thumb and such, we'll have to tweak the ends so that they more-or-less line up with where a REAL bone would be if the character was actually alive. If you get stuck, look at your own body. If that doesn't help, get the wife to take off her clothes so you can see how she bends.
Oh, you laugh, but I've done that. It helps to have an actual person you can look at to see how the body actually moves.
Each time you change a bone's orientation, remember to open the joint editor and click the "align" button. It's found when you have "center" selected. Sometimes you won't want to do this, but usually you will.
Next, you want to adjust the bone centers so that they are pretty much in the center of where the joint would actually bend if it was on a real person. Again, having a real person to look at helps in this regard. Hover over the end of each bone until you get the little circle thingie on your cursor, then click and drag the end of the bone to where it's supposed to be. In this stage, you want to work ONLY ONE SIDE OF THE BODY. Do NOT touch the other side. If you're working on the left, fine, don't touch the right, and vice-versa. Line everything up perfectly, looking at it from top, front and side. Once done, click Figure>Symmetry, mirror the side you've been working on to the other side.
Please note: If I wasn't having to think about this and crank out images and such, I'd probably be done by now. The advantage of using the PHI builder is that you don't have to draw the bones. And drawing bones is DAMNED TEDIOUS. Poser just LOVES to screw up while you're doing bones, and the most insidious, horrifying of crashes usually happens after you've spent an hour working in the setup room and haven't had a chance to save. Poser is evil like that. PHI builder makes poser a lot less evil.
Now, the "buttocks" group is kinda special. What we're gonna do is make the bone itself really, really small. This way, both the buttock group AND the thigh group will rotate on very nearly the same axis. You CAN make it zero length, but don't, it makes it a pain to find later if you have to adjust it. Just make it really small.

Addenda 11/8/3014: The main advantage to having a buttocks group is that you can divide the bends between thigh and buttocks so the rotations of the hip joint are spread between the two groups, and can be more perfectly optimized. With Rose, for example, the "buttocks" group handles the knee being swung back behind the character and swung outwards away from the centerline, with twists disabled. The thigh handles the knee swinging outwards (and inwards when she's sitting), twists, and swinging the knee forward. She then has ERC dials in the thigh that control all these movements, so her bends at the hip are basically perfect.
Once done, exit the setup room, save the character to the library. Then, if you're tired, go take a nap. Because if you're tired, you WILL SCREW THIS NEXT STEP UP. Because next up is the actual rigging. This was just grouping and boning, man, this is the easy stuff. The hard stuff comes now. And I'm tired, so I'm gonna take a quick nap, then get right back at it.
--------------------------
Alright. A fairly obvious question is "how in the hell can you rig a character so quickly, particularly when you are doing it drunk as shit?"
Well, the answer is three parts:
1) Poser is easy.
2) I follow the same procedure both suber and drunk. But when I'm sober, I get caught up in details, tweaking every last vert for optimal performance, and can spend an hour just working on one joint. When I'm drunk, I don't give a crap, don't have that degree of focus anyway, and don't waste that much time on one joint.
3) Poser is easy.
Okay?
Okay. First, some basics:
Not counting the spine (and things like tails and such), there are only four joints in the human body which allow three degrees of rotation - hips and shoulders. Every other joint in the body only allows two degrees of rotation, and most only allow one.
No, seriously. Start with your shoulder, the point where your humerus connects to your ribcage. That joint has three degrees of rotation - you can rotate your arm along the Z axis, you can rotate it along the Y axis, and you can twist it along the X axis. Go down one level to the elbow, however, and now there's only two degrees of rotation. You can bend your elbow, and you can rotate your humerus. That's it. Forearm (radius and ulna) has one degree of rotation - you can twist it. That's it. At the end of the forearm, you have your carpus, a collection of eight bones that form the wrist, linked by tough ligaments to the bones of the forearm and the first bones in the hand, the metacarpals. That joint only has two degrees of rotation - you can bend it side-to-side, and you can bend it front-back. That's it. The first joint of the fingers and the root joint of the thumb also only have two degrees of rotation - you can move them side to side, and you can bend them up-down. That's it. The remaining joints of the fingers and thumb only have one degree of rotation - you can bend them. That's it.
Now, I know, you're probably thinking "AHA! I CAUGHT YOU IN A MISTAKE, YOU CAN TWIST YOUR THUMB! THREE DEGREES OF ROTATION!"
But, the truth is, you CAN'T twist your thumb.
No, seriously. Your thumb is set off to the side, and at a different angle than the rest of the bones in the back of your hand, and there are only four muscles that move it around. One is up in your forearm near your elbow, it's got a big long tendon that runs down to the thumb-side of your wrist, it pulls the thumb back. Then, there's a big muscle between the metacarpal of your thumb and those of the other fingers, this one pulls the thumb into the others. Then, there's two more muscles that make up the round bit in your palm at the base of your thumb, they basically pull the thumb over and in. It's like a rope wound around a log, with the log chained down at one end. Pull the rope, the log will both rotate towards you around the chained end, and it will roll from the rope being unwound, but you can't JUST roll it OR rotate it, it's the same action. That's all the muscles you got, there.
Now, Posette, Dork and the P4 Big Hands are all modeled correctly in this regard - the natural rest position of the hand is shown. And in that position, the thumbnail is not aligned to the same plane as the fingernails, it's actually at a right angle.
It's more tedious to RIG it when the hand is modeled this way, yes. Quite tedious, actually. But, if you remember there's only two angles of rotation, it will dawn on you that what you need is a bone at the base of the thumb that goes from the wrist to the first knuckle, but has it's axis of rotation in the same direction as the bones in the back of the hand. This gains you the correct rotation around the connection point, and if the hand is modeled as in the above image, it always looks right. This is, in fact, why I'm always able to get such nice posing out of Posette's hands. Since it is modeled in the actual rest position of a human hand, I'm able to get the thumb and fingers to appear to bend more naturally.
UNFORTUNATELY, nobody makes hands modeled like this anymore, because nobody understands that most joints only have two axes of rotation, and as such they can't get the hands rigged right unless they rig it with the fingers straight out and the thumb level with the palm. So, the thumb becomes a special exception, you have to tweak it's falloff zones carefully to get natural looking bends, and you'll have to use all three axes of rotation to get it to look right.
Okay - so with that one exeption (the metacarpal bone in the thumb), all the joints below the shoulder have only two axes of rotation. See?
Okay: Well, same thing applies to all the joints in the legs below the join of the femur and pelvis. Only two axes of rotation. Rotating the foot along the axis of the leg as a whole doesn't happen at the ankle, it's like your wrist - the rotation is actually from the two long bones above it.
Is all this anatomy boring you yet? ;-)
Well, the point is that the secret to good bends is remembering that most joints, you only have to make look good for rotations along two axes.
Okay, more in a moment.
-
Okay: Drunk or sober, the procedure I follow is this:
- Work only on one side of the body, saving the scene after you finish each joint.
- Start with the hip, and work down to the foot.
- Go back to the hip, and work up to the head.
- Go back to the chest, and work outward to the fingertips.
- Rig other body parts, such as wings and tails, similarly.
- Figure>Symmetry to mirror your work from one side to the other.
- Save the figure to the library.
- Open the CR2 in a text editor to make final edits (such as preventing eye rotations from affecting the head). Save the file under a different name, and without closing the text editor, open the new file in Poser and make sure it works. If it does, save as the original file.
- Rig ERC (such as hand grasping, tail wiggling, and so on).
We're going to take this item by item, and I'll show how to rig each type of rotation (twist, bend, side-side). But not for EVERY joint, gawd, that would take months to do.
When rigging a "twist" joint, you want the red end of the axis to go a bit inside the previous group, so as to have smooth transitions in twisting. The green end, you want to stop a bit short of the end of the group. This is because the group down the chain will always be fully affected, so you want the verts at the end of the group that connect to them to also be fully affected. Remember I mentioned that when grouping, you have to remember how joints work in Poser? Well, this is what I meant. Though I could have followed along with the topology, it was too slanted - rigging this area would be very difficult. So, I sliced straight across the axis of the leg. This makes it a LOT easier to rig.
Oh - and the red bit is the outer boundary marker, the point of zero influence, and the green bit is the inner boundary marker, the point of maximum influence.
-
For "bend" joints, you want to adjust the outer angle markers so as to encompass a good bit of the previous zone, but be VERY careful to not encompass the zone above that one, as well, or it won't look right. Now, the green inner angle markers of maximum influence you adjust to get the most natural appearance you can through maybe thirty or forty-five degrees of rotation from default.
Now, when rigging "bend" joints, you will frequently run across this problem. Notice how the inside of the joint is flattening out beyond about 45 degrees of bend.
Sometimes (very rarely), you can correct this by just switching on the "Apply Bulges" option in the joint editor, and tweaking it a bit. But, this depends on the mesh. And usually, it doesn't work well, if at all. Other times you can correct it by applying the old Poser 4 "sphere" zones (leave the setting at "multiply" for full backward compatibility). This works very often, but requires a bit of fiddling - I'll show how it's done in my next post. However, sometimes tweaking falloff zones and such just doesn't work.
So, we introduce you to a useful tool: Phil Cook's "Poser Pocket Knife." Because we're gonna build JCM's on the fly to take care of this.
No, really.
First: SAVE THE SCENE.
Done? Okay, we continue.
We're going to start with the morph brush. Smooth out the appearance of the fold using a combination of the "flatten" and "smooth" options, and shape the leg so it looks right when bent. Take note of the exact degree you have the joint set to with the morph at full - in my case, it's 71 degrees.
Now, back in the bad old days before I had PP2012, man, this was tedious. Because when I had P7 I had to use the morph brush to create the morph, then, when it looks right, I had to do it AGAIN on the other side. And "flatten" wasn't an option, I had smooth and pull. Ugh.
But hey, we've got PP2012. Do it once, then use the "mirror" button in the morph-brush window. In the drop down, you can choose "figure right-left" and "figure left-right." Mirror it across to the other group. WOOT!
Okay - now, I want to use the "save a copy as" button, and save the morph with a name I know I am NEVER going to use in the character. Like "Electric_Boogaloo." This is because the PP2012 morph brush creates these morphs in EVERY group. That's how it's able to do mirroring of morphs and stuff. Once done, click the "Zero Morph" button to clear the "Custom Morphs" in all groups. Don't forget.
Now, for the sake of simplicity in this tutorial, we're going to assume that the morph I just made only affects the "thigh" groups. In actuality, the morph I made affects both the thigh AND shin groups. Where multiple groups are affected, you have to repeat the below steps to create the JCM's for each group that was actually affected. Got that?
Okay!
Next, we open the groups that are actually going to be affected (in this case, the thighs), and set the "Electric_Boogaloo" morph to 1.0. As we set each one, we're going to click Object>Spawn Morph Target, and create a new morph (essentially duplicating the "Electric_Boogaloo" morph in that group). So you can find and identify the morph later, name it JCM_ at the beginning, then whatever it does as the rest of the characters, up to a max of 15. In this case, I called it "JCM_Knee_Bend".
PP2012 has a bug where the morph dial doesn't immediately appear, you have to click another group, then click back. Do so, make sure it's there and it's correctly named. If it's not, delete it and do that again. If it IS there, zero the "Electric_Boogaloo" morph, and set the new morph to 1.0 to make sure it works correctly. If it doesn't, delete it, set Electric_Boogaloo back to 1.0, and try again.
Okay, it's there? And it works correctly? And both groups have the morph, and they're both named correctly and identically?
Great! Now, we call up Phil's Poser Pocketknife. In the Poser Pocketknife window, we click "Delete Morphs & Materials", then click "Delete Morphs From List." In the popup window that opens, we select "Electric_Boogaloo," and delete it. This makes ALL the Electric_Boogaloo dials (which we have in every damn group because of how the morph brush works) go ker-poof, keeping our figure nice and clean. You can also delete the unneeded "Custom_Morph" dials at the same time. Don't worry if you mess up, Poser Pocketknife automagically saves a copy of the scene before it makes game-breaking changes like this.
Addenda 11/08/2014: Poser Pro 2014 allows you to just delete these large morph compounds by going to the body location (where the master dial will be), selecting the morph, and deleting it from the drop-down.
Check, make sure everything's alright and you didn't accidentally delete the wrong dials. If something's wrong, click the "undo" button on Poser Pocket Knife to re-load the temporary scene that it saved.
No? Everything is fine?
Then SAVE THE SCENE.
And don't just hit ctrl-S, navigate to where you saved the scene before, otherwise you'll just be saving to Poser Pocketknife's temporary folder.
Done?
Okay, we continue.
Click "Back" in Poser Pocketknife to get to the menutop, and you'll notice another button called "Remote Control". Click it, and we're at the next menu. Click "Define Master/Slave Actors" to get to the next menu. Next, click the "Master Figure" button, select the figure from the drop down. Repeat for the "Slave Figure" button. Next, click the "Master Actor" button, and select the part that is bending - in this case, we'll do the right shin group first. Next, click the "Slave Actor" group, and select the group that has the morph to be affected - in this case, for the right shin, we select the right thigh. Next, click the "Master Dial" button, and a list of dials in the master group you selected will pop up. Select the dial in question that's doing the bending - in this case, it's xRot. Click the "Slave Dial" button, and a list of dials in the slave group will appear. Select the morph you made - in this case, it's JCM_Knee_Bend (hey, see why I said names were important?).
Okay, time for a little math.
The basic value of the morph is 1.0 at full value. If you remember, I had you take note of the angle the joint was set to when the morph was at full effect? In my case, it was 71 degrees. Call up Windows Calculator, enter 1 divided by 71 - you get (rounding off) 0.014. Click the "Standard Ratio" button in Poser Pocketknife, and enter that value. IMPORTANT NOTE: If the dial value is a negative number (example, -71 on the dial instead of 71), remember that the RESULT value will also be a negative number, and enter that negative value into Poser Pocket Knife.
Got that?
Okay, now click the "Master Actor" button and select the master actor on the other side of the body. Repeat for the "Slave Actor" button, selecting the slave actor on the other side of the body. Since you named the dials the same, you don't need to change anything else, just click "apply" again, and KER-POOF! You just MIRRORED your JCM!
You just made a JCM on the fly.
And for me, it takes maybe all of a minute to do because I've done this so often I don't even think about it anymore, I just click the buttons. Actually sitting down and thinking about what I'm doing, typing up the step-by-step and taking the screenies for that two minutes of work, however, took me four damn hours.
Now, many joints won't require you to create JCM's to get them to look right. In fact, MOST joints won't, you can very often get away with just using the old Poser4 "sphere" zones. However, the process of getting it right requires a bit of fiddling and a lot of practice, because it's done pretty much entirely by eyeballing it.
Now, I've spent all morning trying to come up with step-by-step instructions for this by examining my work-flow, and discovered I don't really HAVE a series of steps I can show you. I just eyeball it, and trying to break that down ended up with me suddenly not being able to get a joint to work at all for quite some time.
However, I have managed to distill it down to this:
For nearly every bending joint in the body, make it look like this:
And the resulting joint will bend like this:
For most straight-up hinge-like bends, that's all you need to do.
Study that first image carefully. Notice that the green sphere intersects the center of rotation, and just barely covers the green falloff area on the side where the joint will be bending. Meanwhile, the red sphere overlaps the joint so as to form a kind of right angle to it. Set that up and bend the joint, then tweak the spheres from there to your satisfaction.
-
---------------
Okay, I think that's all of the basics for rigging joints. I'm going to go through and rig this character and do a bit of work on The Barbarians today, and when I hit the point where we're ready for the next step (final edits of the CR2) or I find something in the process of doing this that should be explained further, I'll post again.
----------------
Oh - thought of something. The "Capsule" zones from Poser 8. You can use them just like sphere zones, but if you do, the figure won't work in Poser 7. Capsule zones have additional settings allowing you to control the height of each end (making it pointy or flat or whatever), as well as allowing you to tweak the diameter of the ring at each end (allowing you to create teardrop shapes or other angles). On a human figure, the main place you'll use this is the first joint of the fingers, so you don't overlap with neighboring fingers. Sphere zones will work everywhere else.
Weight-mapping, of course, is the ultimate - you can tweak each vert to perfection. The downside is that if you're ONLY doing weight-mapping, it takes a loooooooooooooooooong time to rig a chracter. Best to set up the joints with spheres and capsules, then as each joint is done, merge the zones to a weight-map, then tweak the weight-map from there. MUCH faster doing it that way, trust me.
Okay, back to work.
Ah, found one.
Okay, sometimes when you create a morph from the results of the morph brush (Electric_Boogaloo), then try to re-save that as a separate morph (JCM_blabla), the resulting morph doesn't work right. What causes this is that the morph saved out by the morph brush (Electric_Boogaloo) includes data gathered from the falloff zones (specifically any spheres, capsules and weight-mapping you may have done), but the saved out morph (JCM_blabla) does not. What it looks like is this:
The one on screen left is Electric_Boogaloo, while the one on the right is the JCM.
To fix this, you'll need to delete the JCM morph from the properties window (since it doesn't work), and then click to rename the Electric_Boogaloo morph in the groups you want to affect to "RENAME_ME". Not anywhere else, just the groups you want to affect with your JCM.
Yes, we're renaming the morph to "RENAME_ME".
Trust me, I know what I'm doing.
Next, save the character as-is to the library, being careful to NOT over-write existing versions of it - give it a new name.
Next, open a text editor, navigate to the folder you just saved the character to, and open the cr2 in the text editor.
Next, search (not replace) for "RENAME_ME". You should see something like this:
Notice the name of that morph is still "Electric_Boogaloo", only the display name has changed?
Hey, change both to your JCM name.
Oh - and delete that reference to a master dial in the body location, it's not necessary.
When done, you should have something that looks like this:
Repeat the search and repeat the replace action you just did for all the other zones with a "RENAME_ME" dial.
Done?
Okay, save it back to the library under a DIFFERENT NAME (because if you did it wrong or otherwise made a mistake, you don't want to over-write a working character).
Next, pop back to poser and delete the character that's in the scene. Next, refresh your library, and you'll see a new character with no image. Load it into your now-empty scene.
You're now ready to continue with the rest of the "Electric_Boogaloo" method, deleting the unneccessary Electric_Boogaloo and Custom_Morph dials and then setting up the JCM links with Poser Pocket Knife. =)
nanobot said:Before I read further--just got to "JCM on the fly"--I want to say, "HOLY CRAP and THANK YOU!" To Jim!
Welcome. =)
Believe it or not, however, I was doing JCM's on the fly even before I had Poser Pocket Knife. I was just saving the character to the library, opening the file in Notepad and editing it by hand, saving it, then loading the altered character in Poser again and moving on. ;-) I had a text file that had code for a generic jcm saved, and I'd just copy-paste the bits where they go and edit the names to match the character. Then I got Easy Pose Underground, and replaced notepad with it, since it was slightly faster - still the same save-load-edit-save-load process, however. Although it hardly fits most people's definition of "on the fly", with practice you can hand-code a simple JCM in under a minute. =)
Which, incidentally, is why when WilL Dupre was giving me crap about how hard it is to code JCM's and using joint-controlled magnets is so much easier, I disagreed. Setting up a joint-controlled magnet is NOT easy, as the joint bends, the magnet's area of effect is altered (since it's calculated in Poser Worldspace, not Character Space), which means you have to not only rig the magnet to follow, you have to rig it to change along with the character's movement. This is kind of like saying "No, riding a bicycle to the store is too much work, I'm going to use this flaming pogo stick while being chased by angry badgers, that's much easier and faster."
SNAKE! A SNAKE! Oooo-oooo, it's a snaaaaake!
-
Okay - as promised, the Vixen.
I finally worked my way up to the head, and hit a show-stopper - I can't make the mouth close correctly by simple movement. It would require ERC on the "gum" (renamed "jaw" in my current version) that not only does x-rotation but also controls a morph, and after everything else I've struggled with (the shoulder area gave me hell for days and I had to rig it as partially weight-mapped just to get it to bend right), my patience finally expired. =P
So, we move on to the last two items on the list of things I said I'd cover:
- Open the CR2 in a text editor to make final edits (such as preventing eye rotations from affecting the head). Save the file under a different name, and without closing the text editor, open the new file in Poser and make sure it works. If it does, save as the original file.
- Rig ERC (such as hand grasping, tail wiggling, and so on).
Okay:
Originally, you could just draw a dummy bone from the head, use the hierarchy editor to drag-drop the eye bone onto the head, drag-drop the eye-bone onto the dummy bone, exit setup room, then re-enter setup room, delete the dummy bone and POOF! The eye is connected to the head, but no longer affects it.
Well, that doesn't work in PP2012. Unfortunately.
So, you have to manually delete the connections by editing the CR2.
Now, some of you are asking "but Jim, where did you learn to manually edit the CR2 when Poser wouldn't work?" Well, I learned it back in Poser 5 days, because P5 would frequently CRASH when deleting dummy bones. And I got sick of it. So, I took a look at Posette to see how her eyebones were coded, and realized that the only difference aside from bends being turned off was that the head had no reference data down the hierarchy to the eyes.
Meanwhile, others of you are asking "But Jim, why the hell are you bothering to tell us this?" Well, the answer is because you can ADD this data, too. Meaning you can manually edit the CR2 to make ANY bone affect ANY OTHER BONE. So, like, you could have a machine with a valve which rotates, and waaaay over on another part of the machine, it makes another bone that's not connected move.
Hey, even better - in PP2012, adding other groups to be affected is a pop-up window option in the joint editor. No manual editing required. You can't remove groups, no. But you can add them. Very powerful tool, if you ever need it.
Anyway...
Before you do this, because we used PHI editor to create the bones in the first place, the center point for the eyes is not going to be in the center of the actual eye object, it'll be in the back. So, you will want to enter the setup room, select one of the eyes, open the joint editor, and look at the "z" position for the center of the bone. Note that there are two sets of numbers - the one on the top row is for where the bone begins, and the other on the bottom row is for where it ends. Take the "z" position, add these two numbers together, then divide by two. The result is where the bone's beginning should be changed to. Type in that number, then click on any of the other numbers to update the number you just entried. Repeat for the other eye, and you will have moved the center of the bone to the center of the eye. Exit the setup room, make sure "bends" are turned off for the eye, and save the character to the library.
Alright:
Next, we open Vixen_WIP_34a.cr2, and find the "head" actor.
Now, if we scroll down a bit, we'll encounter references to the eyes. For example, we'll see twistz_reye, jointy_reye, jointx_reye, and so on. This is the data that tells Poser how to alter the head when the eye moves.
But we don't WANT poser to alter the head when the eye moves.
Soooo... We delete these entries, save the file under a new name, then check it in Poser and make sure it works. If it doesn't, reload from the old name and try again.
It's really that simple. =)
Last step is rigging ERC. Now, the tail we want to have sinuous movements and stuff, and the best tool for that is Easy Pose Underground. And yes, we could code it by hand, but it takes literally days to do and is astoundingly easy to screw up. Trust me - get Easy Pose Underground from over at RDNA. Not free, no. But worth it.
Okay - so we open EPU and load the character. Click the "Easypose" button to get to the easypose screen, and set up the screen to look like this:
Click the "Go" button, click "Okay" on the screen that follows. Done. Save the character.
No, really. Done. The tail now has ERC rigging.
Yes, it was that simple. Several days of hand-coding, all done with one click. That's why I paid sixty bucks for EPU.
Okay: Next, we're going to rig hand poses. For this, we go back to PhilC's "Poser Pocket Knife."
The first step is to open the character in Poser, and load a cylinder primitive from the props library. Move it to the right hand, size it and orient it like so:
Got that? Good! Now, carefully pose your character's hand so they're gripping the pole. This, unfortunately, is also where you're most likely to discover errors you made in rigging the fingers, so be prepared to adjust the joint zones again and mirror the results to the other side.
When you're done, the hand and pole should look like this:
That particular grip is called a "power grip."
Okay - go ahead and mirror the pose to the other side (you do not need to mirror joint params if you did not change any of them). Done? Good, now both hands should be in a power grip. Save the scene, and we move on.
Open the Poser Pocket Knife script menu, and click the "remote control" button. Select the "hand" group, then click the "Add Dial To Selected Actor" button in Poser Pocket Knife to create a new dial in the hand group, and name the dial "Power Grip." Once the dial appears, set it's value to -1.
Trust me, I know what I'm doing.
Next, click "Define Master/Slave Actors" to open the next menu. From top to bottom: Click the "master figure" button and select the figure. Repeat with the "slave figure" button. Click the "master group" button and select the hand.
Okay, now stop. Now, click on the first group of the thumb/fingers that will be controlled by the new dial, and open the parameter dials window (if it isn't already open). Notice that we can see the settings that we made to pose this particular group (in my case, the first thumb group).
Okay. Now, go back to the Poser Pocketknife window. Click the 'slave actor' button, and select that first slave actor (in my case, rThumb1). Click the 'master dial' button, and select 'power grip'. Click the slave dial button, and select the first rotation dial in the list on the parameters window that isn't at zero. In my case, that would be the 'y-rotate', it's at -3. Click the 'standard ratio' button and enter that value - in my case, I enter -3. Click the "apply" button, aaaaaaaaand...
*TWITCH*
Didja see it? The thumb twitched a bit - and, if we look at the parameters dial window, it's telling us that the adjusted value after the master dial's influence is ZERO. That's why we set it to -1 after we created it. We can see whether we've done each setting right just by looking in the parameter dials window. And, if you entered the wrong value and it DOESN'T show zero, hey, just go back, enter the correct value, and do it again to over-write the old one.
Now, just repeat for all the dials in this group, and all the other groups of the fingers and thumb.
Once done, go over to the other hand, and start again, creating a "Power Grip" dial and linking it up.
Takes a bit of clicking, yes. And you need to be very careful to select the correct groups and enter the correct values. But this is literally the easiest and fastest way to do this. Seriously. And we can create dials to curl the fingers, form a "precision grip", and other hand poses we may think are necessary by following the same process.
And hey, if we don't want to repeat this entire process for the left side, no problem - Easy Pose Underground has a "Mirror ERC" function. Just save the completed character with the finished dials on the right hand, and mirror them over to the left hand with one click.
----------------------------
And that, Ladies and Gentlemen, is how I rig a figure, from start to finish.
-
How to Extract Any Procedural into a Texture for Editing in Photoshop (or whatever):
Here's how I usually fetch out a procedural. Note that this pretty much works on anything.


-
How to Use the Morphin' Clothes Program:
Well, obviously, first you have to have the program:
http://www.renderosity.com/mod/bcs/morphing-clothes/64629
Next, you'll have to have a reason to use it. Here, I've decided that I want Mikey3RR to wear the P4 Man's Catsuit.

After a few minutes work (HAH!), Jim has magically converted the P4 Man's catsuit to Mikey3RR.
However, now it will need morphs. Here's where Morphin' Clothes comes in.
First, load the program, load the figure we will work from , and (in this case) select all the FBM's in the body.
Note that there is an "Exclude" button here - it allows you to exclude parts of the figure from morph calculations. It works by either material zone or by actor group. Most times, however, you won't need it.
Next, we load the clothing.
Note that there is a "Solid" button, for designating parts of the clothing that are, well, solid. Like buttons and belt buckles and stuff. This works by material zone, however, so if you have a shirt with the buttons and the fabric both on one material group, you'll have to edit the model to change the mat for the buttons.
Next, we have the transfer screen. The settings I have below work with nearly every transfer I do.
Here's what each parameter means:
Maximum Samples: The way the program works is that it iterates through every vert in the figure, looking for nearby matching verts in the clothing. A setting of 50 means "Look fifty times." Generally speaking, this works fine for clothes that DO fit rather closely, DON'T have morphs that make them open, and DON'T have rigid bits like buttons and such. For clothing that fails any of these criteria, you may want to lower the Maximum Samples value to get better results - like to 3 or less. Higher Samples - smoother morphs, but may ripple with "open" morphs as the morph will cross both parts of the opening. Lower Samples - More precise morphs, but may have bumpy parts where the verts on the figure are too far away from the verts on the clothing.
Symmetry Samples: This is additional samples done to insure the morph is symmetrical (where applicable). I usually leave this at 5, but you can lower it to 3 if you need to speed up calculations.
Distance Weight: There are three possible values, here: 0, 0.5, and 1. A value of 0 is no falloff - this means that verts in the clothing twice as far away will receive the same pushing around as nearer verts. A value of 0.5 is linear falloff - this means that verts in the clothing twice as far away will receive half the pushing around as nearer verts. A value of one is exponential falloff - this means that verts in the clothing twice as far away will receive a quarter the pushing around as nearer verts.
Distance Falloff Start and End: As it says. The values are (theoretically) in Poser Native Units, which means that 1.0 equals about eight feet. In practice, however, it seems 1.0 is more like a tenth of a PNU, or about ten inches. If you ever end up with morphs that are all ripply and spikey, you may be tempted to adjust this value to reduce the area of influence. Well, don't unless you simply have no other options, because it is tremendously tedious to get it right. A better solution is to try reducing the number of samples, first.
Separate Right and Left Actors: If you are working with pants for M4 or V4, always have this on, otherwise morphs in the thigh groups will overlap. If you're not working with M4 or V4, however, you can leave this off to speed up calculations.
Ignore Actors not in Figure: Somewhat mis-named. The actual effect is that actors which aren't in the clothing (like head, hands and feet in the jumpsuit, above) are ignored. However, if the clothing has actors the character does not (such as clothing that adds wings or a tail that the base character doesn't actually have), only actors that the figure actually has will influence the morphs created in the clothing.
Ignore Actors Hidden in Clothing: As it says. When working with M4 or V4, always have this on. M4 has a "Morph Group" bone that's hidden. It does absolutely nothing, but he still has it anyway. V4 has an assload of magnets, each one counting as an actor, that are all hidden. With this check-box on, the program ignores all that crap, because it's all marked as "hidden" in the CR2.
Ignore Morphs Already In Clothing: As it says. Usually it's best to leave this on - after all, if the clothing already has a "bodybuilder" morph, no need to have the program calculate a new one.
Clothing Is Skirt: Self explanatory - though it does presume that the actual "skirt" portion of the clothing is the "hip" group. Ticking this on allows you to activate the sub-parameters. Falloff distance is apparently in PNU, so 1.0 = about eight feet. You can also add a "widen" morph, which you can choose to have split right-left and front-back.
Enable Cross Talk: Always leave this OFF. Remember, despite how popular cross-talk is in the Poser community, cross-talk is a BUG, not a feature. Sure, making clothes with cross-talking morphs can allow you to conform clothing and have the morphs automagically follow the character. However, it can also mean you conform the clothing, and then can't adjust any of the morphs in the clothing afterwards. Or all the morphs come on at double-strength, and you can't turn them down. Cross-talk is a BUG, not a feature. Don't use it.
Hide Controlled Morphs/Independent Morphs Only: You will always want to leave "Hide Controlled Morphs" on, and "Independent Morphs Only" off. The reason is because the way Morphin' Clothes works, it generates an ASSLOAD of dials across neighboring groups, many of which move only one vert just a teeny tiny amount. You will want to hide all these extra dials to keep the parameters window clear and useful, so leave "Hide Controlled Morphs" ON, and "Independent Morphs Only" OFF.
Well, having set all our parameters and chosen an output file (do NOT over-write your original, EVER), we then click the transfer button. Once done, we load the clothing into Poser, conform it, and see how it works. If it doesn't work right, hey, no problem - tweak the parameters, and try again.
And hey, worked fine first time.
And that's the Morphin' Clothes program, in a nutshell.
-
Making a Panorama for Poser, Part 1:
Initial discussion:
The "Why" of it: Put simply, creating a large and complicated scene in Poser involves large amounts of polys. This, of necessity, means a very long render time. Using a panoramic image as the backdrop allows you to dramatically shorten render times, and place your characters in a scene that is literally as realistic as a photograph - because it IS a photograph.
The Drawbacks: The image you use is shot from a specific location in space and time, with specific and fixed lighting. This means that you can't move the camera around without making the panoramic background look weird. The idea is that you position the camera and the panorama, then position the characters so that you can get the shot you want without moving the camera. It IS possible to adjust height, but this is a smidge complicated if you want the pano to still look right, we'll cover how to do it later.
Okay, now there are several different ways of obtaining a pano for Poser. If you're lucky, you can find what you want just doing a google image search for "360 pano". If you want panoramic images that are (usually) free to use, try googling "360 pano wikimedia". In the first part of this tutorial, we will go through the entire process with a pre-made pano downloaded from wikimedia. In part 2 of this tutorial, I'll show how to create a pano from scratch, either using your digital camera, or a software environment renderer like Vue or Carrara.
Alright. When using a downloaded pano, you have to assess the image carefully before you just nab it. Some panos are going to be pretty much impossible to put your character into, because they were taken from a high location and do not show any ground near the camera. For example, this one here is an absolutely beautiful pano:
https://commons.wikimedia.org/wiki/File:Isla_Pitahaya_-_Playa_Santispac_-_Bahia_Conception_Island_360_pano.jpg
Problem:
The image was shot from a lighthouse, looking down. Meaning that if you put your character into this image, unless they can fly like superman, the closest they can be to the camera is quite a few yards
away. So for now, we'll leave it and move on.
The image we're going to work with is this one:
http://commons.wikimedia.org/wiki/File:Spitzkoppe_360_Panorama.jpg
It's a pretty famous image (well, famous for a pano, that is). Shot in the desert of Nambia, we can easily see rocks and stuff that are nice and close to the camera, and we can perch a character on them.
Step 1) Download the full-size image. Do NOT attempt to open it in your web-browser, your browser may CRASH AND BURN because the image is HUGE. Just right-click and download it somewhere.
Step 2) Resize the image in your preferred image editor, maintaining the aspect ratio, to a width of 4000. Poser's limit on images (any image) is 4096 wide, and
it gets damn finicky with high-definition images on those last 96 pixels. Play it safe - resize to 4000 wide, maintaining the aspect ratio. You should end up with an image that's 4000x707.
Step 3)
Determine the viewing angle. A full 360x180 pano (360 degrees around, 180 up and down) will always be twice as wide as it is high. If you don't know why, it's clearly been awhile since high-school geometry, and you've slept since then. ;-) Anything less than 2x1 is going to mean the viewing angle up-down is smaller. If this image was full 360x180, it would be 4000x2000 after being resized. Since it's 707 high, that means the viewing angle is a bit shy of 64 degrees. This is kinda crappy, but we'll work with it. Ideally, we want 90 degrees or better.
Step 4) Now, there's actually a LOT of different ways we can proceed from here. We can make our camera match the focal length of the original camera, we can do some really fancy math, and end up with a projection method to project it onto a cylinder matching a specific height and radius. We can project onto a sphere specifically UV-mapped to match the viewing angle of the image from a central point in the world. I mean, folks, we can get damned complicated here and spend hours screwing with this.
Or, we can do it the Jim Way. Because Jim is lazy and it's been a long fuckin' time since geometry class, I've slept since then, I want a picture, not an exercise in mathematics.
Oh, let's do it the Jim Way, you say?
Okay.
Open the resized image, and change the canvas size so it's 2x1. In this case, that would mean 4000x2000. Then move the horizon line of the image upwards until it's roughly in the middle, about 1000 pixels down from the top. Promote that to a new layer. Go back to the bottom
layer, and spray, bucket or clone a bit of sky right at the top edge to fill the top. Repeat for the bottom edge, filling in the bottom. The modified image should look something like this: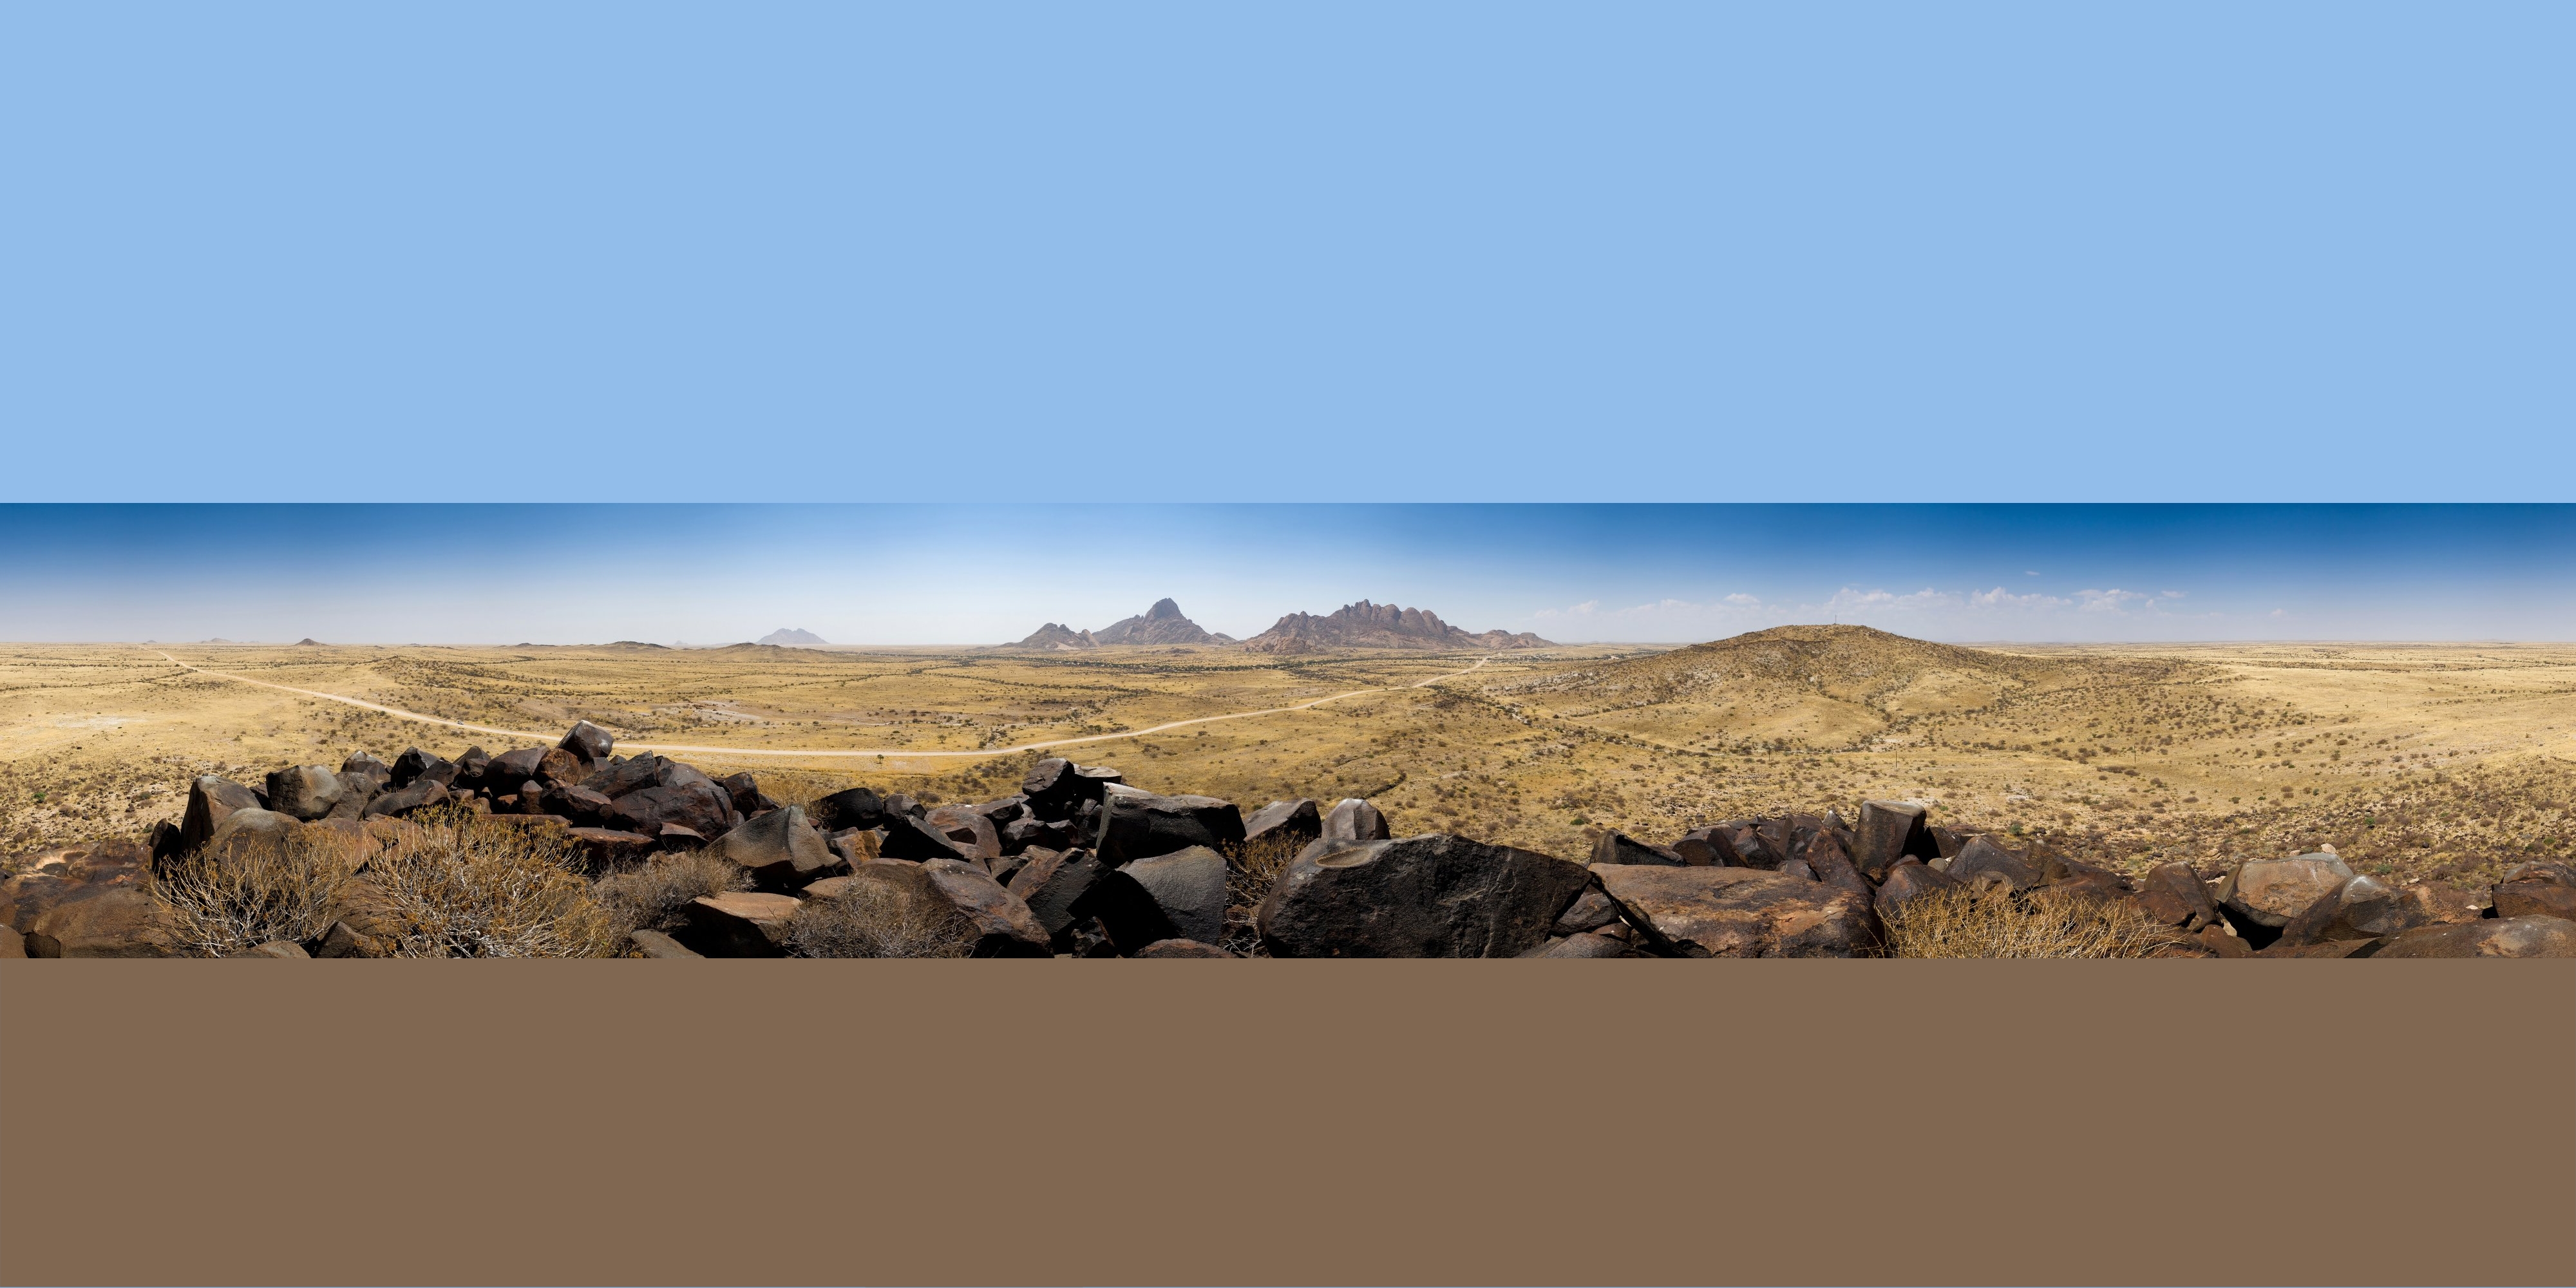
And yes, feel free to download and use this image. After all, it's ready to go.
Next, you're gonna want to put this on a sphere that's mapped to show it correctly from the inside. And that sphere is gonna have to have the polys facing inwards. Don't have anything like that? Hey, no worries. I do - download and install this toy, and you'll have a pano sphere to paste that picture to.
Jim's Pano Sphere.zip
Here's how you need to set up the material on the sphere:
Load the prop, set the material as above, switch off shadows for the sphere in it's "properties" tab, and hey - we're ready to peek at it in Poser and see what we got. Should see something like this:
Hey, now we're cookin' with gas. More in the next post.
-
Making a Panorama for Poser, Part 2:
Now, this next bit is if you do NOT have an image compositor. If you DO have a pano image compositor, skip down a bit. If you're on a Mac... Well... Google? I don't know. I'm pretty sure there are image compositors for the Mac, but I don't know of any myself.
No image compositor? Okay - then let me introduce you to one of my personal friends, Microsoft Research's Image Composite Editor:
http://research.microsoft.com/en-us/um/redmond/groups/ivm/ice/
The PROGRAM is what you want. Not Silverlight or anything else. Just MSICE. That's my little buddy, there. Choose 32-bit or 64-bit, as appropriate for your system. Download, install, make sure there's a shortcut to it for your desktop.
All done?
Okay, then forget about it for a bit, because now we get into the tedious shit.
Picture, if you will, a sphere, with you inside it, holding a camera...
Well, wait, I got Poser. Lemme MAKE that picture and save your imagination-oriented brain-cells some effort.
You, standing inside a sphere.
Now, if you look around with a camera, the camera itself can only see a certain amount of the sphere, measured in degrees:
So: The key in making a pano image is to 1) Perfectly match all the edges of all the images together (easy if you're using a rendering program like Carrara or Vue, virtually impossible with a digital camera). 2) Have enough overlap in the images so they can be matched together.
With a rendering program, this is a snap - you need to set the camera to 12.5mm focal length, and take six shots - north, south, east, west, up, down. They will all perfectly match, edge-to-edge, like a skybox. You can also render out a complex Poser scene this way, then save yourself some memory load later using the rendered images converted to a pano. Note that wherever possible, you WILL want to render the images out as HDRI. This will improve their use as IDL sources.
With a digital camera, taking shots of the real world, this is not so easy. You have to look at the image the camera is going to take, and remember what's in the image. Find visual landmarks in the image that are halfway between the center of the image and the edge. Then, in the next shot, rotate the camera so that the landmark is in the center of the image. With a typical camera, it will take about 16 shots to make a full circle, looking at the horizon. As you raise/lower the camera to take circles higher/lower, it will take less. For most cameras, it will take on the close order of 60-90 shots to take images of the entire sphere, depending on your field of view. You don't need to take large, high-rez images (though it's nice if you can) - just covering the whole sphere is the goal, or as much of it as you can. Oh - and don't worry about taking pictures of your feet or your shadow, part of the game, here.
Done?
Okay - now the easy part. Well, it's easy IF you covered all the sphere adequately with your images.
1) Open MSICE.
2) Drag-drop the images into ICE.
3) Wait. After a bit, it will composite them into a pano image. If everything looks good (or even if it doesn't), you can export the result by clicking file>export to disk (or hit ctrl-E). Pick a folder and filetype, save, done.
Now, if there's gaps and you were using a rendering engine, well, it means your camera wasn't set right. Or your software lies to you about focal length. Either way, you can simply re-render the areas where gaps appear. Typically, you just need to render Up-NorthEast, Up-Northwest, Up-Southeast, Up-Southwest, Down-NorthEast, Down-Northwest, Down-Southeast, Down-Southwest. Close MSICE, add those to your previous renders, open MSICE, and drag-drop the new collection onto it to create a revised (and hopefully fixed) pano.
If there's gaps and you were using a digital camera, this gets harder. Returning to exactly the same spot and daylight usually is impossible. Thus, you'll likely have to fiddle with the image in a photo editor like photoshop, using the clone brush and other tools to cover over the gaps. You CAN, however, cheat. Instead of trying to image the entire sphere, just image around yourself 360 degrees, trying to take a decent amount both above and below the horizontal. The results can be pasted together, and will end up looking basically like the pano we worked with in the first part of this tutorial - doesn't cover the entire sphere, but still usable.
Either way, once you have the pano, you use it just like the above image, with the pano sphere I gave you.
Well, that's the best I can tell you for now. Let me know if there's any questions, I'll try to answer them.
-
The real key, for me, is using panos allows me to create scenes that would take a coon's age to render - and, frequently, scenes I simply don't have the resources in various poser props and buildings and what-not to do. And matching lighting really is as easy as I showed. With indoor panos, it's frequently just a matter of turning on IDL and throwing an infinite light with the diffuse set to black to get specular lighting (the specular-only light being a trick Nan showed me). With outdoor panos, a single white or slightly yellow-white light works for sunlight in nearly every scene, and lining it up is simply a matter of pointing the camera at the sun in the pano image, dragging the light to center on the sun, then switching on IDL to light the rest of the scene.
Creating your own panos from photographs with MSICE really is as easy as I said, too. I just went outside, took exactly forty snapshots at 1024x768 resolution (the minimum the camera can shoot), threw 'em into MSICE, then exported the result. After some editing in PSP5 to cover a gap in the sky near the sun, I ended up with this image:
It's not perfect, no. There are some noticeable distortions, particularly in the fence and the roofline of the house, the overall image is warped towards the sky because I didn't take enough evenly-spaced images of the sky itself, and the resulting image is blurry as hell because my camera has shit for focus. But hey - it's a free pano image, and took less than five minutes outside and five minutes in PSP to make. I could probably further edit it to remove my feet and my shadow, there's plenty of grass there I could use as a clone source. Still, just as it is, I can make an image like this using the above techniques:
Hey, not perfect, no. But let's look at the flip side - considering that my modeling and texturing abilities are not anywhere near the challenge of modeling a real-life scene, exactly where am I gonna get a model that will look like the exterior of my house? Nowhere.


Howdy, Stranger!
It looks like you're new here. If you want to get involved, click one of these buttons!